Cab Door Overhaul
by Richard Atwell
(c) Copyright 2009-2011
Cab Door Overhaulby Richard Atwell |
|
Bentley's Body and Frame chapter is a little sparse when it comes to steps required to repair and restore the cab door. Here's a set of step by step instructions for working on the cab doors of your baywindow bus.
As repairs go, working on the doors is not as difficult as some other jobs but you do have to be careful trying to prize fitted parts free. Be patient and remember that nothing has to been forced free. If you are having to exert a lot of force then stop before you cause unwanted damage because it means you are going about disassembly incorrectly.
Having said this, most things are hard to do the first time while the second time around goes extremely easily by comparison. For this reason, try not to do both doors at the same time if you have both to fix. Hopefully the tips in this article will help ease your first experience with door disassembly.
It always amazes me as I take apart these vehicles how quickly the factory workers were able to assemble these vehicles. It goes to show you what the right tools and training can accomplish. There must be elements of the design that were geared to assembly but I find that they are difficult to see simply by looking at them.
As usual the photos are from my 78 westy and some steps will differ if you have a passenger van or older model but the techniques are the same. The steps for removal are linear: you need to follow the steps in the previous sections before you can proceed to the next.
None of these tools are absolutely necessary but as is often the case, having them greatly reduces damage, makes the job easier as well as go a lot faster.
|
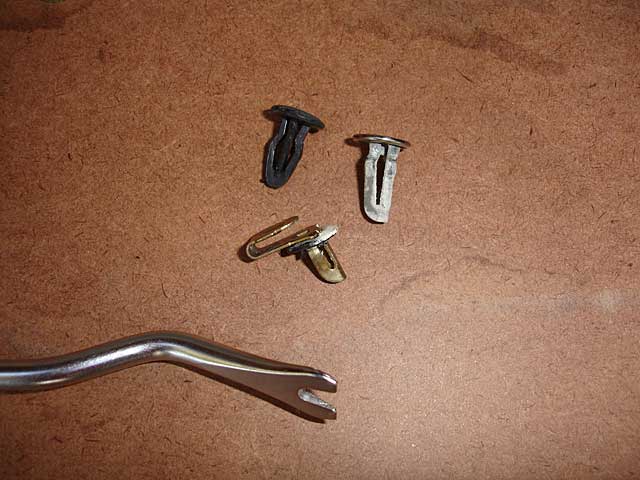
1. The first tool is a door panel trim tool. Unlike a screwdriver, the ends are not sharp and its crooked neck allows it to easily get behind trim panels. The tapered forked end is designed to pry the door panel clips from the grommets holding them. You can also use this tool to pry surface mounted panel clips like the black and silver variety found in westy's panel vans, pickups, etc that hold the hardboard panels in place. If you have to use a screwdriver, you might want to blunt or tape the end of and old one before use. |
|
|
2. This is a window seal tool I picked up from a junkyard bus years ago. I'm sure you can still get them through VW vendors although RMMW as seen printed on this tool has been out of business for a long time. Having two of these tools is handy if you can find them but one if good enough for most tasks. Wooden implements are also suitable. |

|
|
3. Rubber mallets are handy for hammering parts back into place. You can also use a block of wood and a carpenter's hammer if you are careful. |

|
There are two important preparation steps before attempting later stages:
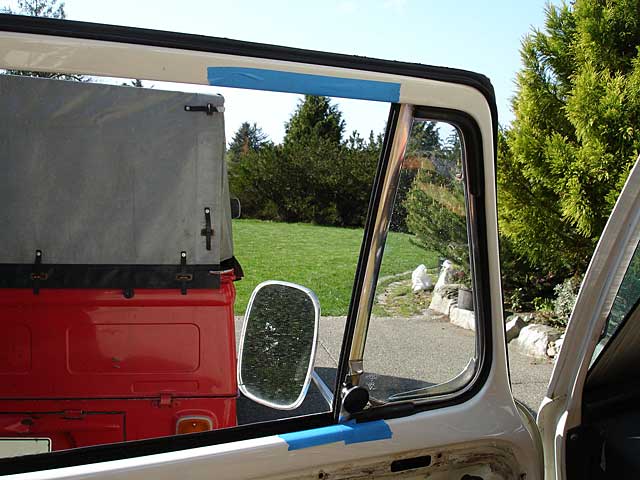
1. To prevent any scratches to the window, apply two strips of blue painters tape to the vertical edges of the window because these parts are the most susceptible to scratching during window removal. You don't have to cover the entire window with paper and I've found if you do the window becomes difficult to insert later. Don't worry about scratches to window parts hidden by the felt channel.
2. Lower the window all the way to the bottom. Now we're ready to take the door apart.
|
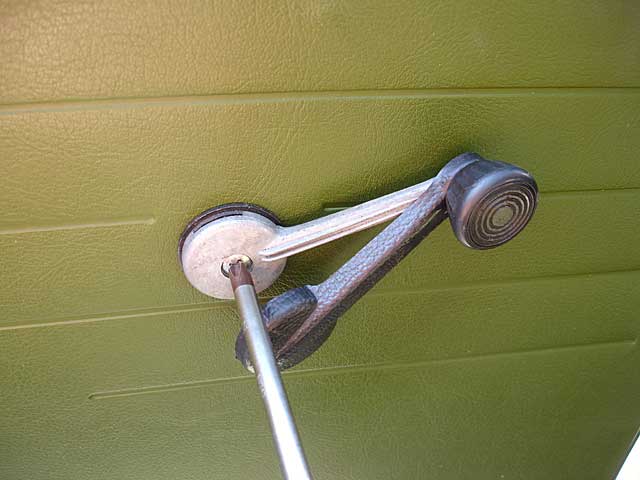
1. To remove the door panel you have to reveal the hidden fasteners. Carefully pry back the plastic cover of the window winder. This will reveal the #2 phillips screw. |

|
|
With the screw removed the window winder will pull straight off and the black window buffer behind it will drop free as well. Save all of these items in a Ziploc bag for reassembly later. |
|
|
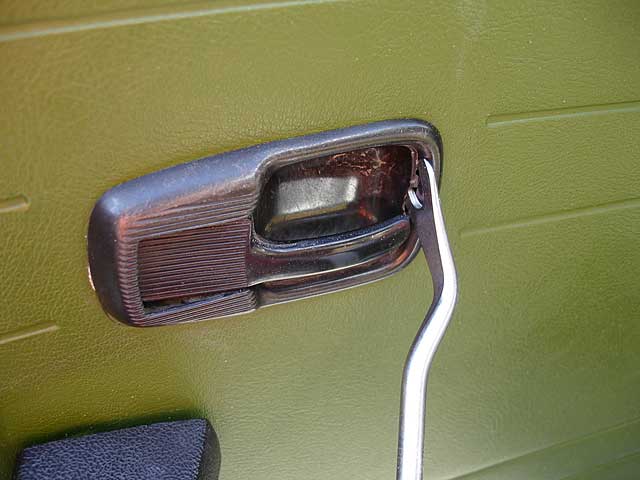
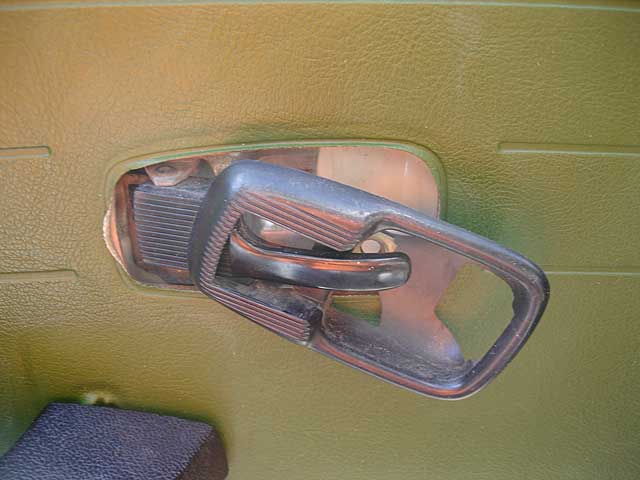
2. Now remove the trim plate underneath the lever for the inner door handle. You'll see a small gap in the corner and you can lever it out from there. |
|
|
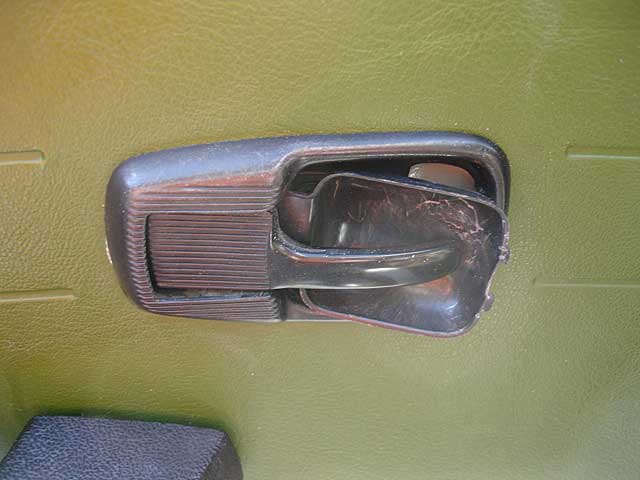
Pull it free from the right side. |
|
|
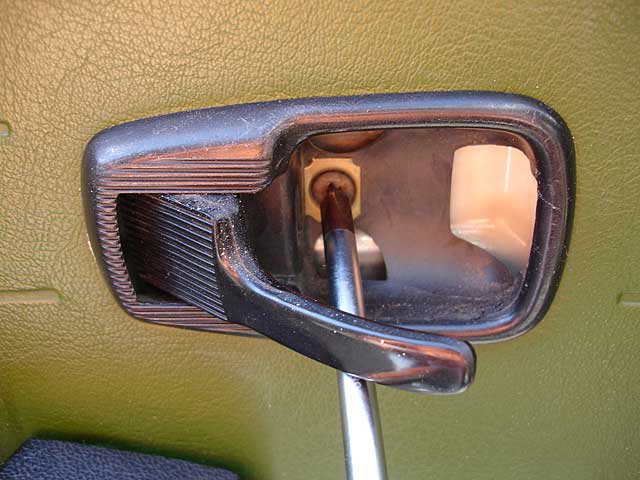
3. With the trim plate removed you can see the screw holding the escutcheon in place. Use a #2 phillips to remove the screw. Sometimes the gold colored washer will come free so be ready to catch that. You'll need to use one hand to pull on the lever while you remove the screw with the other hand. |
|
|
Pulling on the door handle lever, slide the escutcheon to the right to free it. Bag these loose items with the window winder parts. |
|
|
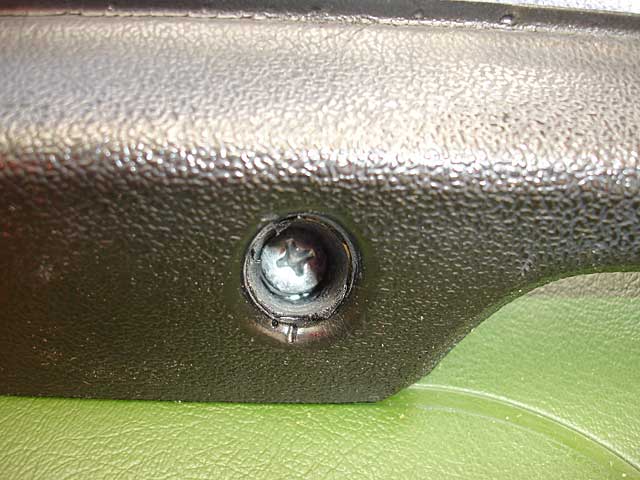
4. The next step is to remove the arm rest. On late model Westys the arm rest is held on by three phillips screws accessed from below. The earlier models had a separate door pull held on with two screws just like the non-Westfalias. |

|
|
#3 phillips screws are used to secure the armrest. |
|
|
5. There is a vent in the cab door that is often forgotten about while you are driving. You can either pop this cover off now or leave it attached to the door panel and it will come off as one piece. Because the blue knob that closes the vent is bent downwards this means that you'll have to slide the door panel down to remove it with this cover in place but that is what gravity wants to do anyway. The plastic clips that hold the cover in place are part of the cover itself; it help to lift up on the cover to release it. |

|
|
6. Removing the door panel is a matter of levering the 21 trim panel clips that hold the panel to the door. Use your trim panel tool to pop the panel free at each location as you work your way around the edge. Start At the top right corner and work your way clockwise to free the panel. This will keep the panel in place and you can grab hold of it as you release the last few clips along the top. |

|
Last step: temporarily reinstall the window winder.
The vapor barrier behind the door panel is held on with a double sided tape that is re-usable unless the tape gets contaminated with dust and dirt. In my case the barrier itself was also torn up by my painter so I had to replace it.
Coming Soon...
|
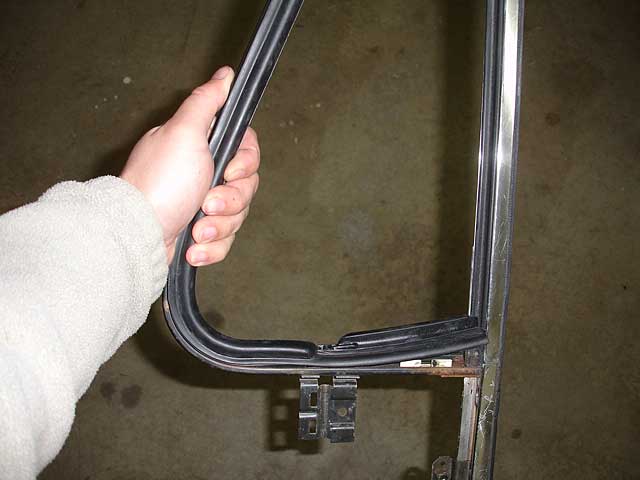
1. To remove the window you first need to remove the window channel felt. The felt is a single curved piece that is held in place by five barbed clips (3 above, 2 side). Pry the felt out of the clips using a gentle rocking motion. The fabric on the outside of the channel will appear torn after removal but the clips will still be able to secure the felt in place when you re-install it. |
|
|
2. As you free the channel from the clips, pull it down from the top and then work to free the section at the side. |
|
|
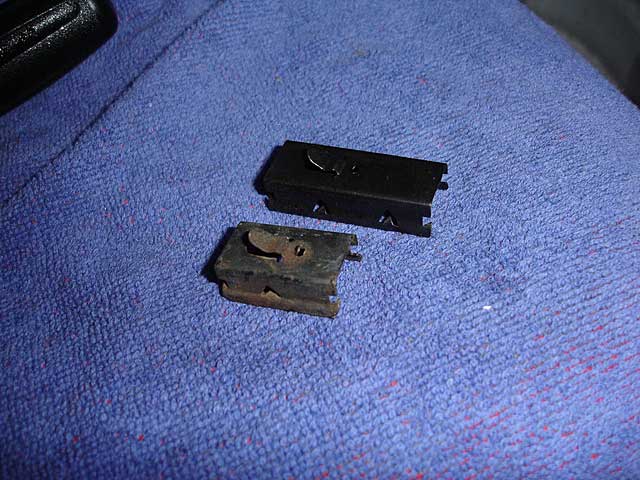
3. The felt clips are held in place by a small tab. The entire clip is made from spring steel but you will find that the tab is not very durable and has a tendency to break. The felt clips can be replaced if they are broken. If you don't have replacement parts on hand I would leave them in place unless you need to remove the outer scraper in which case they must come out. |

|
|
Sometimes the clips come out by prying on them a little and other times they have to be tapped with a punch and hammer before coming loose. Be careful with the tab and take note of the orientation of the felt clips for re-installation. |
|
|
Replacement felt clips are available but they are slightly larger than the originals. My guess is that they were enlarged for the Brazil bus because the genuine VW windows scrapers available come from Brazil. The scraper is not identical in look and fit compared to the original but it's very close. |
|
|
4. The best way to re-install the felt channel is to partially install it with your hand and then using the window seal tool placed in the channel, hammer it gently into place. |
|
|
1. To ease removal and re-installation of the window scrapers you need to lower the window beyond the winding limit. First, wind up the window so both bolts clear the door frame. With the vapor barrier pulled back, undo the two 10mm bolts that hold the window lift channel to the window regulator lift bracket. |
|
|
2. With the bolts removed you can wind the window back down to the bottom and then lift the window up by the lift channel (support bar) and then carefully lower it behind the bracket letting it rest of the bottom of the door. |
|
|
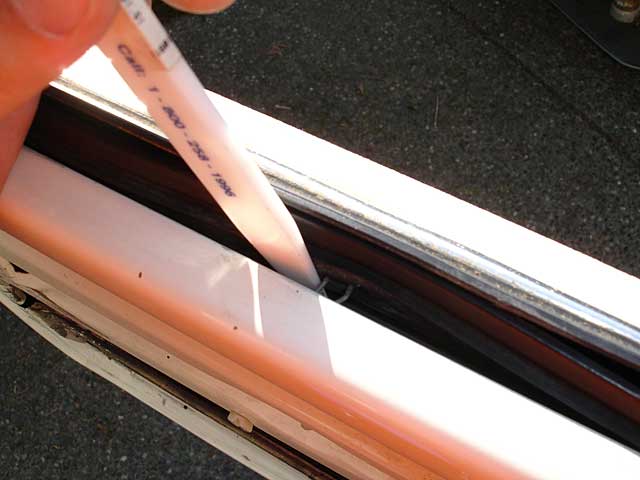
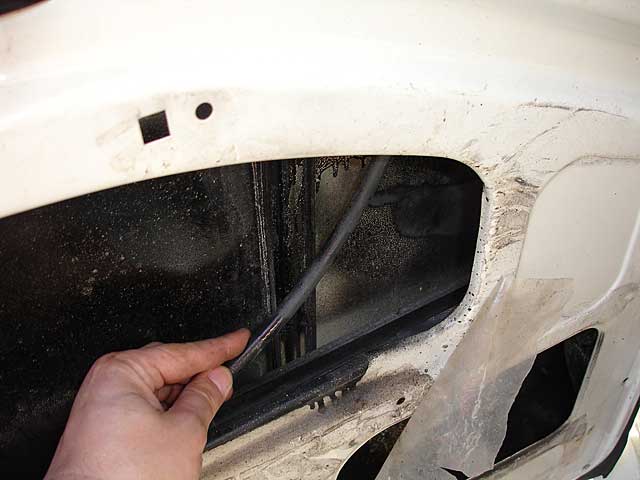
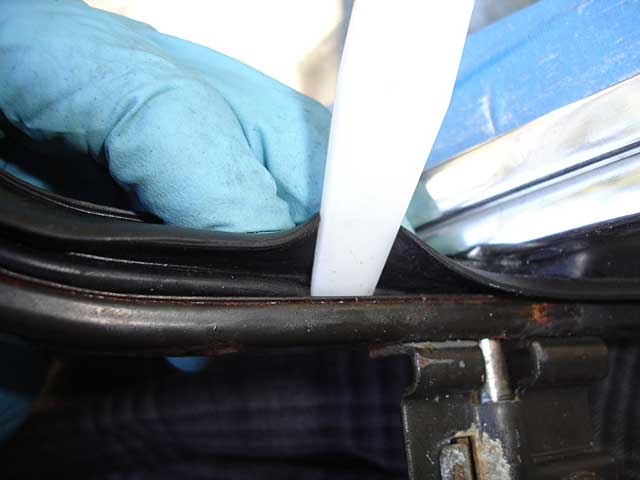
3. To remove the inner scraper use your window seal tool and wedge it between the lip of the scrapers and the door frame. As you do a clip will start to appear and begin to pop out from its notch. Work your way up and down the scraper to release all of the clips. |
|
|
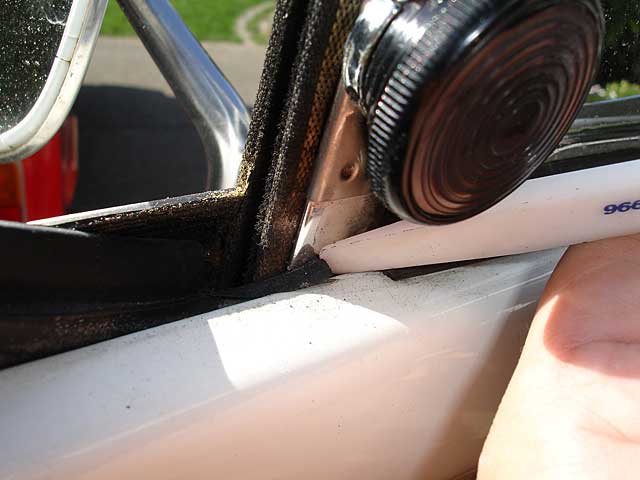
4. At the end of the scraper there is a section of rubber that is wedged between the post of the vent window and the door. If you aren't replacing the inner scraper with a new one, be careful not to tear any rotten rubber there. Use your window tool to put it free. Seal lubricant sometimes helps especially upon re-installation. |
|
|
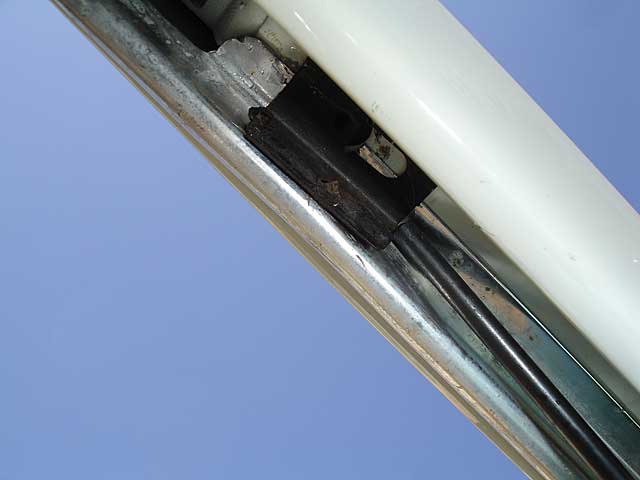
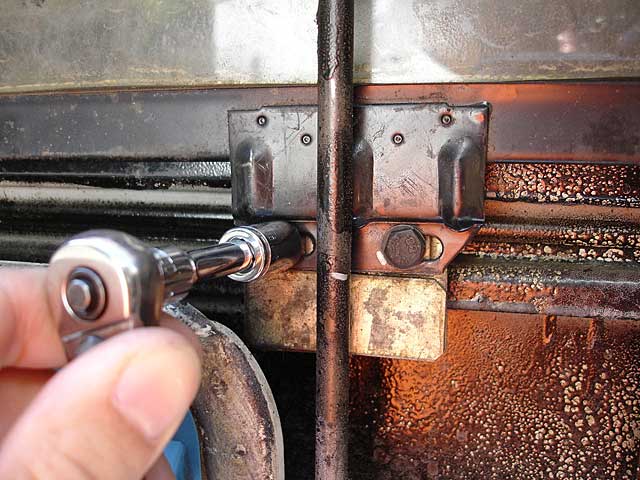
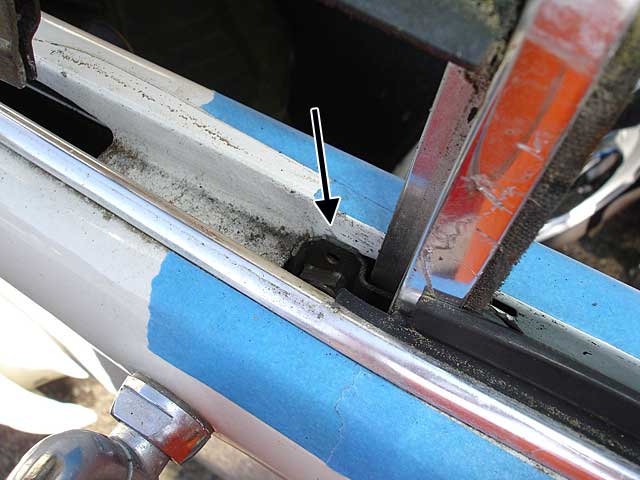
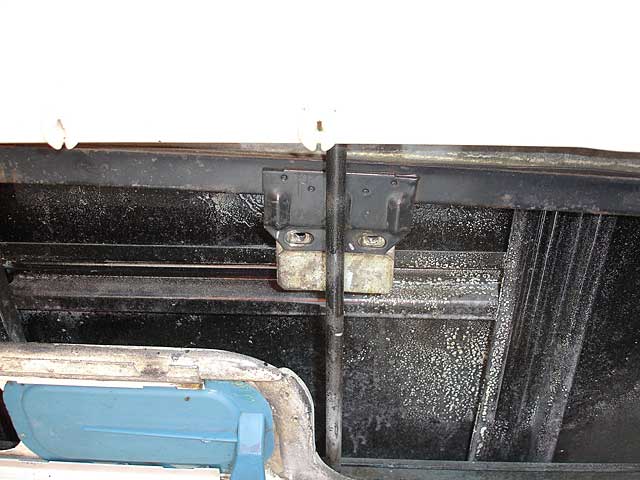
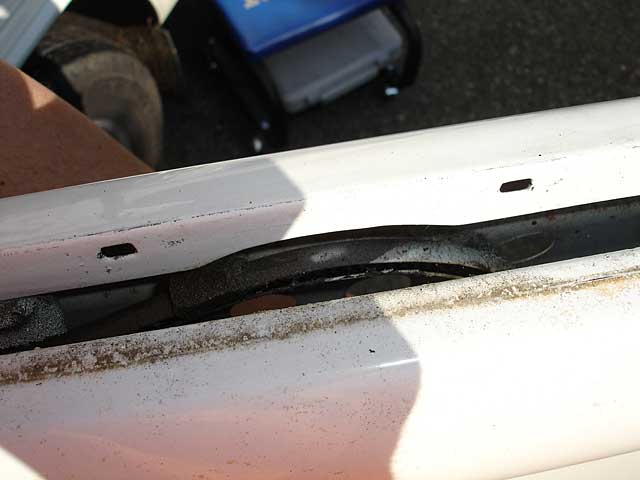
1. Removing the vent window is the hardest part of the whole job so if you haven't taken a break already now maybe a good time. First, remove the 13mm bolt behind the vapor barrier that holds the post of the vent window to the door. The access hole for the bolt is recessed so touching a magnet to your socket will aid with removal. |

|
|
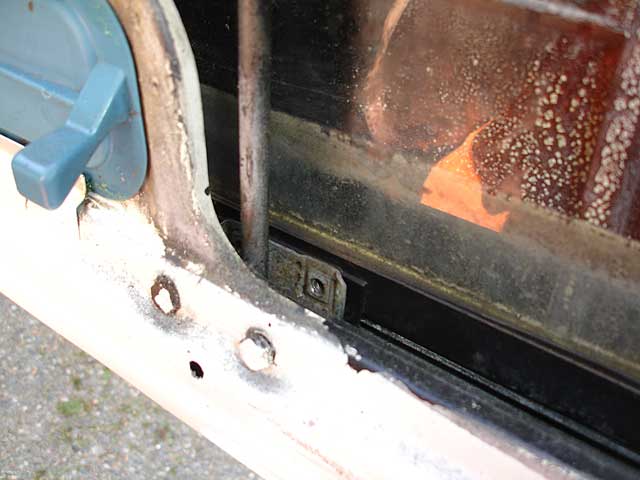
2. Before trying to yank out the window, remove the screw hidden above in the channel where the felt channel is installed. Use a #2 phillips to remove it. |
|
|
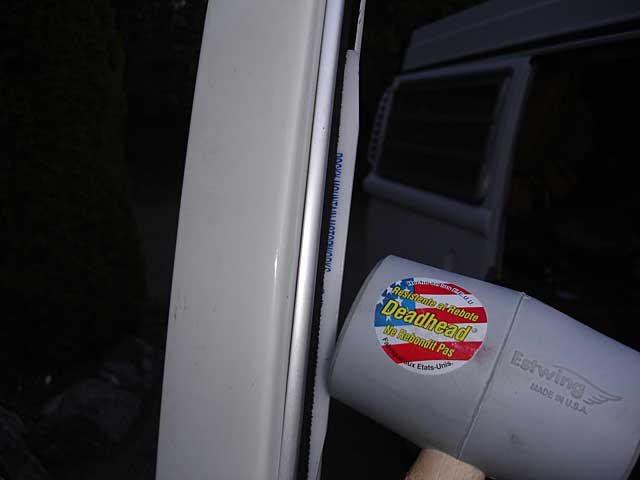
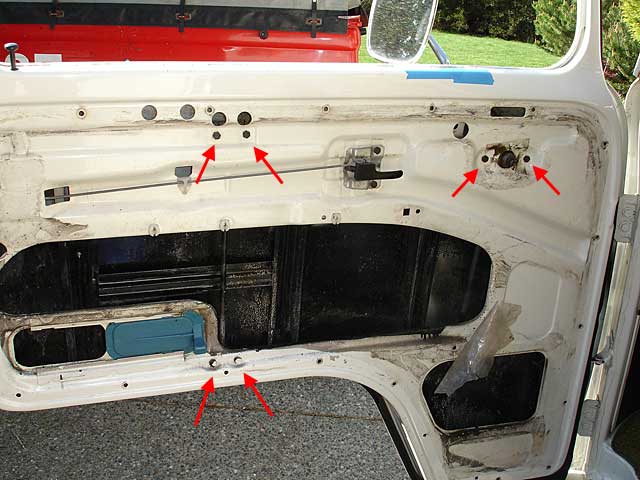
3. Before proceeding it's a good idea to apply some tape to the door to prevent it from being scratched. Even if you haven't repainted yet the possibility of deep scratches exist as you fight to remove the vent window. |
|
|
You don't have to go crazy with the tape. A couple of strips covering the work area is sufficient. |
|
|
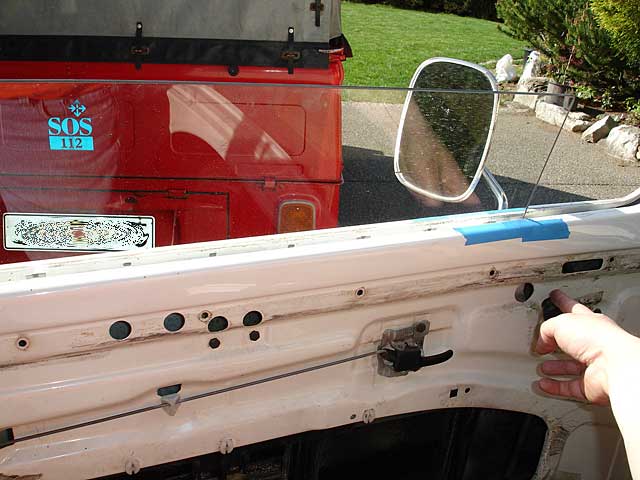
4. With the tape in place and the fasteners removed, use your hand to knock back vent window a couple of inches. |
|
|
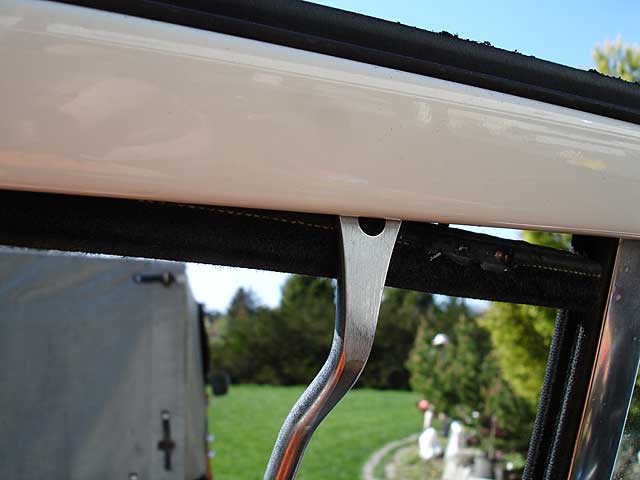
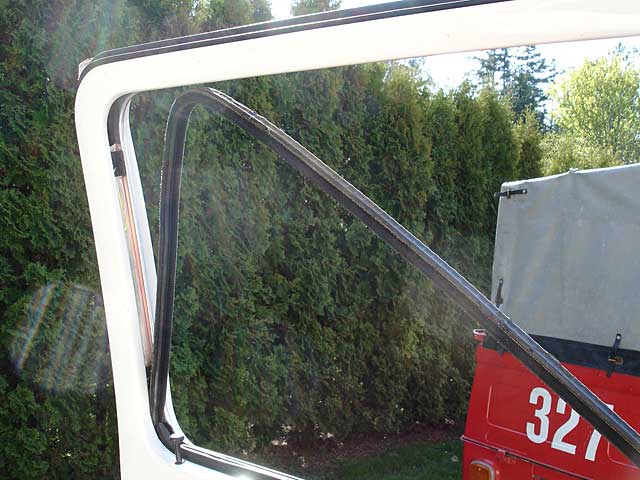
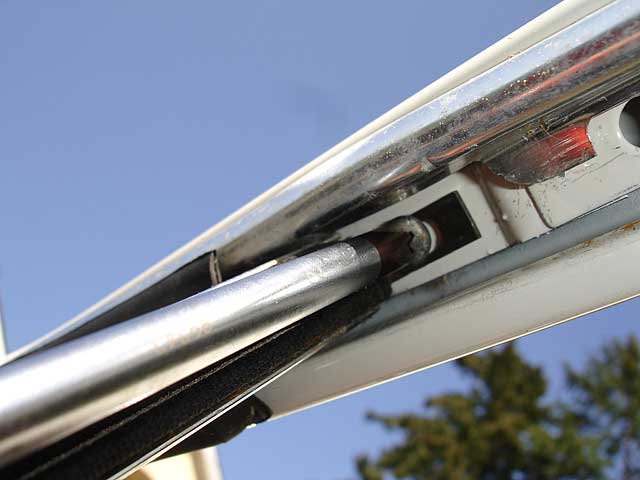
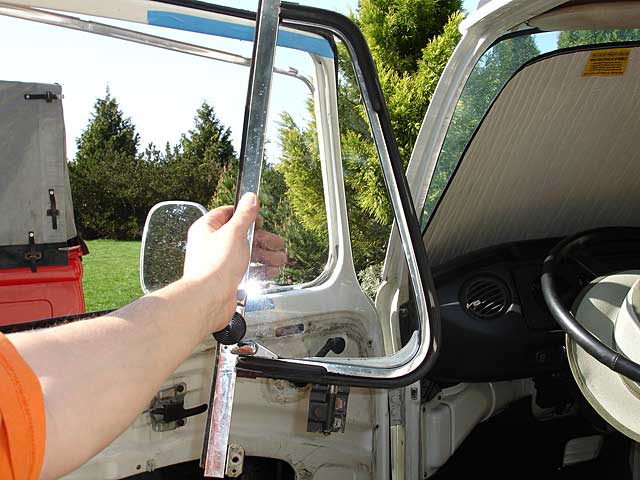
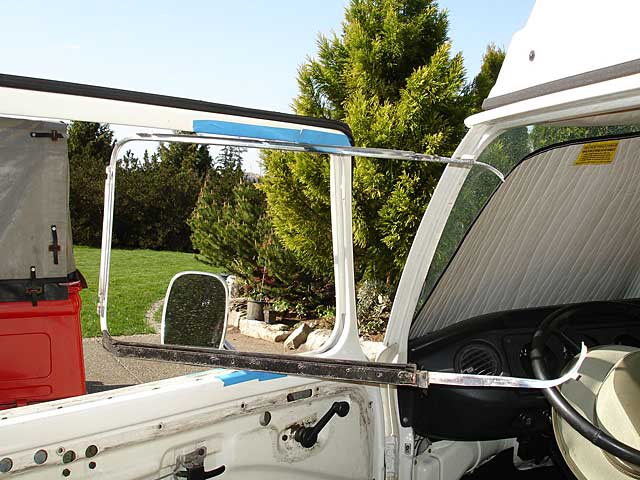
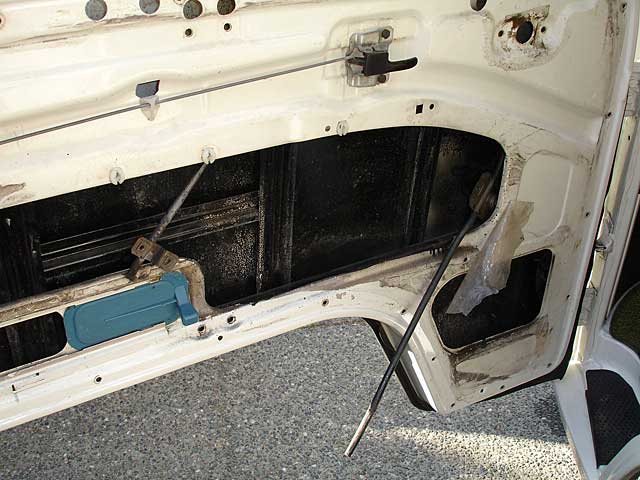
5. Here's the hard part. With the window tilted back slightly, start to lift the vent window assembly from the door letting the top clear the top of the door on the inside. |

|
|
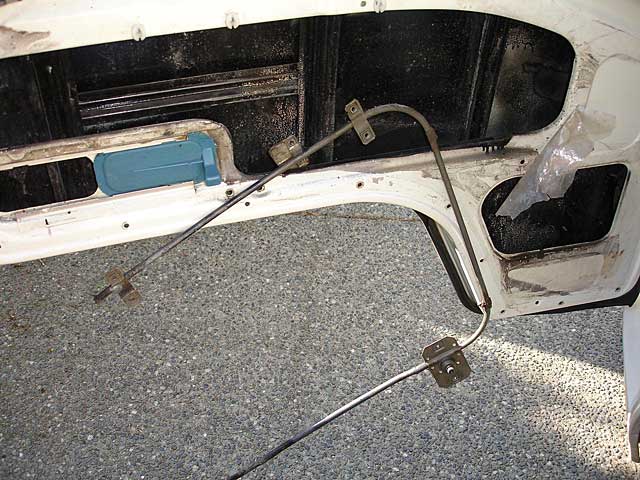
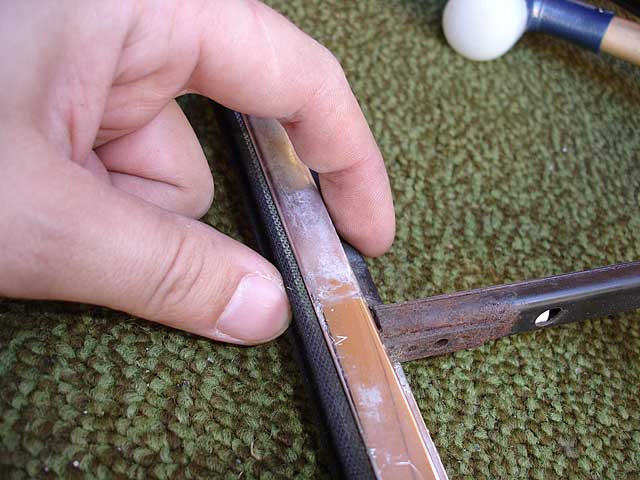
Keeping you from completing your task is this bracket that will not want to twist and get caught on the inside of the door. Watching that you don't scratch anything you have to pull the vent window out of the door using a combinations of wiggling and lifting and tilting. The angle that you have to remove the window is awkward (as seen in the picture above) so be patient and the assembly will eventually lift free. |
|
|
Thank goodness that's over! Interesting fiction: the dealerships presented master mechanics with a trophy in the shape of a vent window after completing their final and hardest certification exam. :-) |
|
|
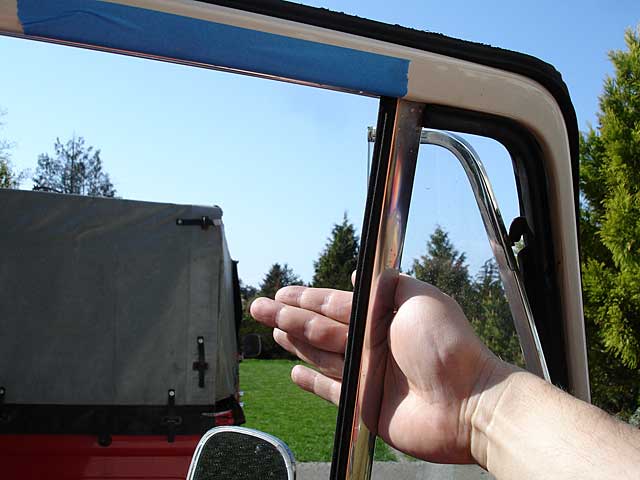
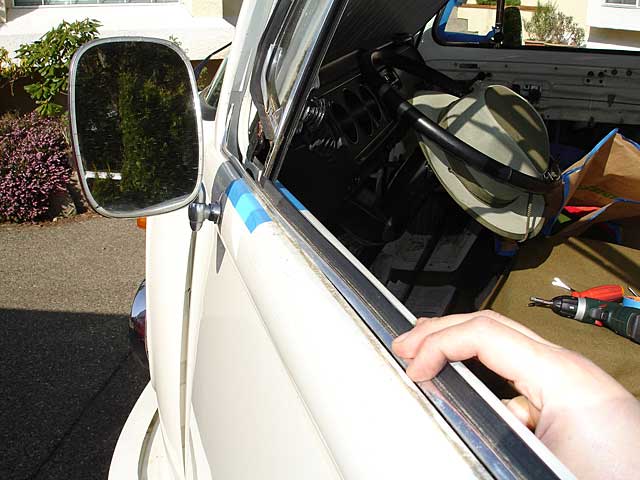
1. If you haven't removed the five felt channel clips earlier now is the time to do that before the outer scraper can be removed. Using your hand, pull back on the scraper's metal trim from the inside. This will reveal tabs that fit into slots in the door the same as the inner scraper. |
|
|
2. Work your way up and down the scraper using the window tool to release it then lift it out of the channel in the door. |

|
|
Sometimes the tabs pop off but it's not a worry since you can pull them free afterwards and re-install them in the old scraper. Is there anything this tool can't do! |
|
|
Even a new scraper will let a certain amount of water bypass it but these old ones with their worn out rubber let even more pass and help to rust out the bottom of the door. |
|
|
1. Lift the window back onto the lift bracket of the window regulator. It should be in the bottom position unlike this photo which I took after raising the window and realizing I had forgotten to take a photo. |
|
|
2. Wind the window up. Without the window scrapers and with the window lowered you will have to guide it through the opening as you initially wind it. Where is the painter's tape protecting the window I talked about earlier? It should be on the window edges at this point because the barbs on the felt channel clips can scratch the glass as you raise the window. |
|
|
3. With the window half raised, use one hand to hold the window and the other to continue the winding process. With the window near the top you can begin to lean it to the inside and pull it free with both hands. Now go and wash 30+ years of dirt from the lower part that you could never wash before. |

|
|
1. Six 10mm bolts hold the window regulator securely. Remove them with a socket wrench and bag them. You might be wondering by now why the inside of my door is black? It was POR-15'd by the painter several years ago. The white specs are overspray/runs/etc. |
|
|
2. Lift the regulator slightly on the vent window side of the door. |
|
|
This will allow you to raise the regulator cable plastic tube and free it from the hole that holds it in place. |
|
|
3. With the plastic tube free, tilt the regulator into this position using one hand on the left and the right hand on the plastic tube. |
|
|
Then drop the regulator through the opening in the door. |
|
|
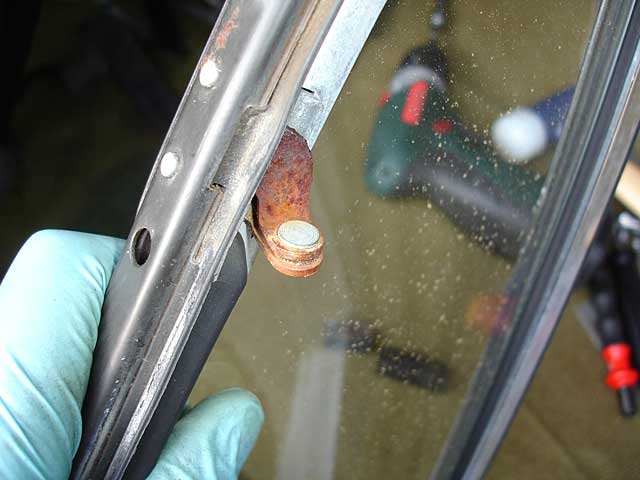
Do you need to change the seal in the vent window? Taking the vent window apart is a destructive process because the window is riveted to the frame. Maybe your supporting arm is rusty like mine? |
|
|
The two halves of the window are held together with a special rivet. To remove it you need to grind off the bottom shown here. Mostly likely you won't find a similar replacement rivet or have the tool to secure it. Although not as clean to look at you can use a pop rivet in its place. |
|
|
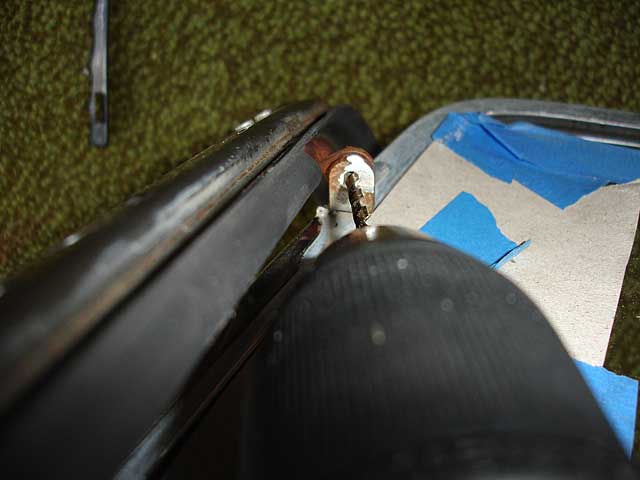
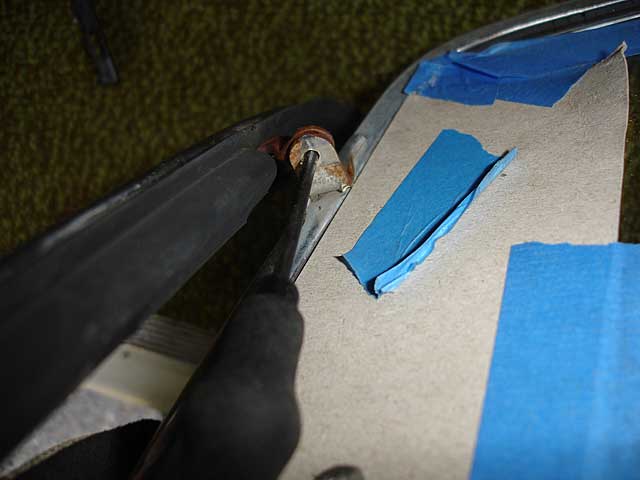
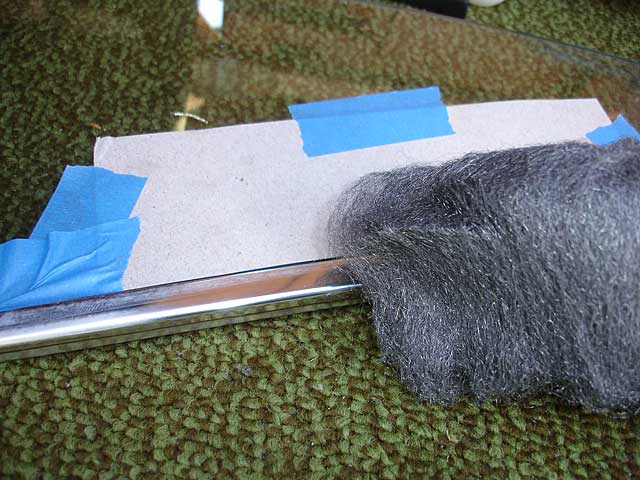
1. Carefully grind off the back of the rivet. You can see that I've protected the glass from accidentally glances from the grinder with a strip of metal sandwiched between two pieces of cardboard. Even so, you need to be very careful with the grinder. A Dremel tool probably will work best in this situation. |

|
|
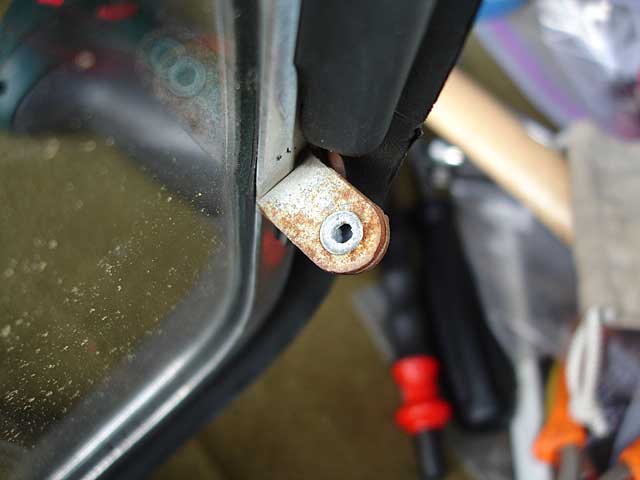
2. Drill the center of the rivet out taking care not to enlarge the opening in the supporting arm by using the appropriate drill bit (I forgot the size I used, sorry - the hole is 4mm iirc). You'll find it easiest to access the rivet if you open the window slightly. |
|
|
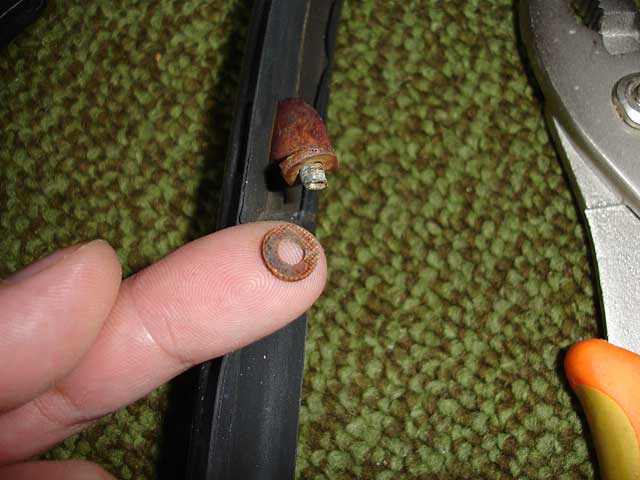
3. Using a pin punch, drive the rivet through to remove it. |
|
|
Don't loose this fiber washer. Bag it! |
|
|
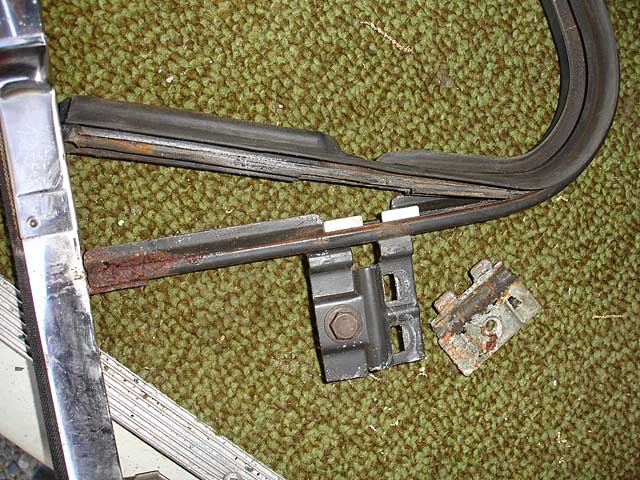
4. Undo the adjusting clamp bolt using a 13mm socket wrench. After removing the bolt and washer (bag 'em) kick yourself (ouch!) for not remembering how many turns of the screw were required to set the tension on the clamp. Just keep a rough idea of the turns because you're going to scrub the clamp with brass brush and then grease it so the window opens smoothly. Before of the greasing, the number of turns will differ. Luckily VW made it so you can adjust the bolt with the vent window installed using only a box wrench so if you get it too loose or too tight, you can test that the window stays open at highway speeds before securing the trim panel to the door. |
|
|
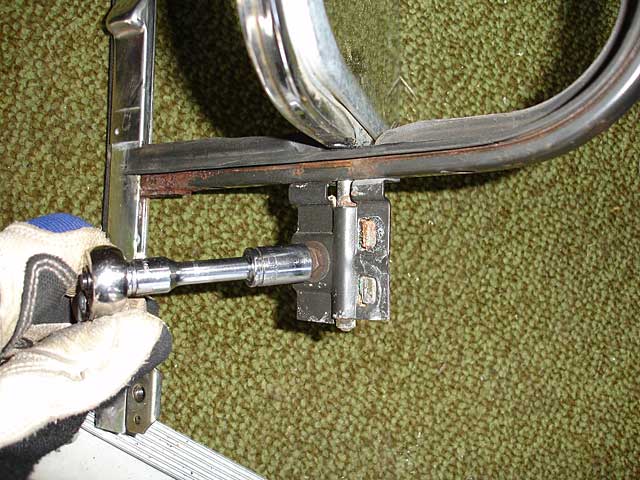
5. With the clamp undone you can pull the quarter-lite from the top by sliding the pivot pin through the opening in the frame. Look at that clamp: there's a good example of the galvanic corrosion that can occur when dissimilar metals touch. |

|
|
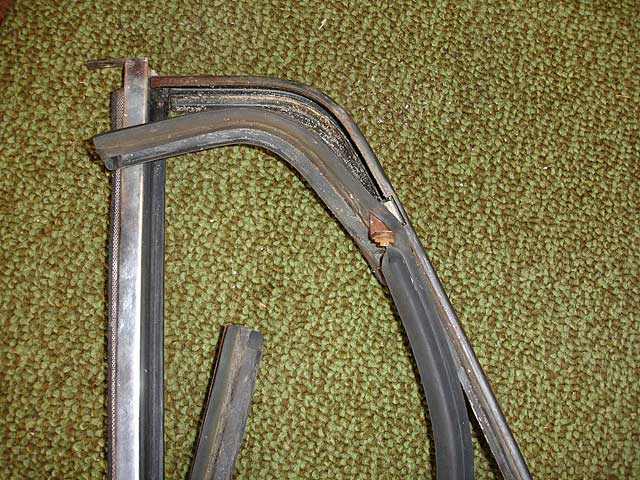
6. Start pulling the seal from the bottom edge shown in the photo. The plastic guide serves to keep the seal from binding with the pivot pin. |
|
|
Thread the supporting arm through the seal to remove it completely. |
|
|
Now it a good opportunity to remove the rust and repaint these area. All of the black frames that VW uses as windows rusted like this. The seal of the inside of the frame and the window channel on the outside should be replaced if they are in poor condition. |
|
|
I also decided to shine up the chrome parts. Fine steel wool (0000) works well as it does for chrome hubcaps. Don't work it too hard or you will scratch the chrome. Use a polishing compound that will remove the oxidization. |
|
|
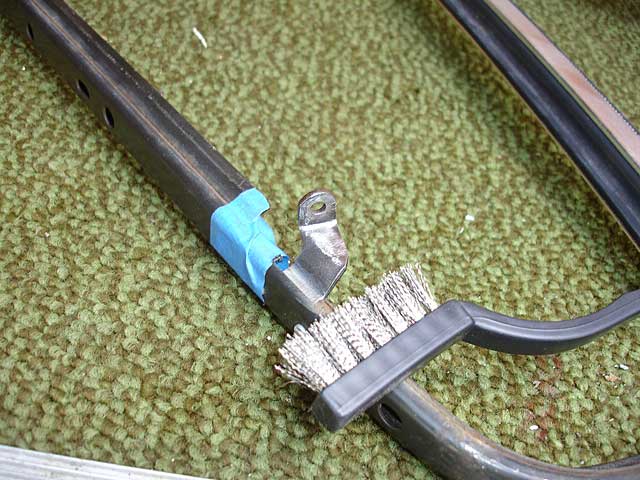
So long rust! I used a stainless steel brush to get rid of the rust and a little help from the flap wheel on my grinder. This is bare metal now so it has to be covered with clear spray paint or it will rust all over again. |
|
|
7. Thread the seal through the supporting arm and work it into place by hand. |
|
|
You'll find that the seal has a complicated shape and it will be difficult to fully seal in its grove. You can see the bulge on the seal in this photo and it is supposed to catch in the frame's groove. I used the window seal tool is push the seal into position all the way around. Be sure the seal is properly seated or the vent window may bind against it before you can lock it closed. |
|
Coming Soon...
|
As I mentioned earlier the window channel clips are now larger than the originals. This presents no real issues and serves to better secure the outer scraper. It appears to be a design improvement although the tabs are still as flimsy (maybe these clips have been renumbered by the vendors from another model). |

|
|
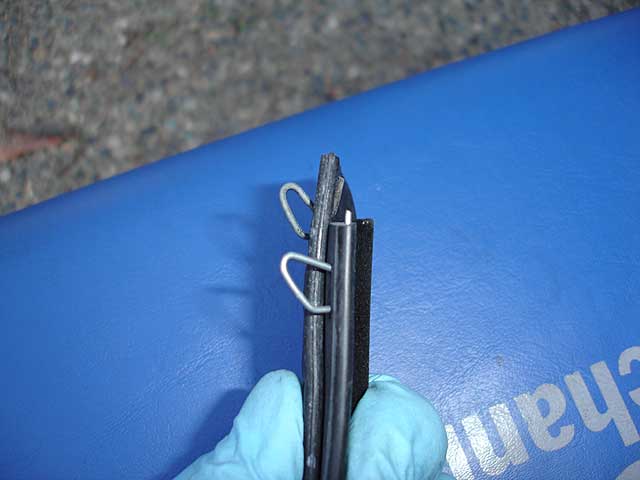
The replacement inner scraper has clips that are stouter than the originals and they are not bent in the same way. This can make is a little harder to re-install and I found that the window seal tool was essential for bending them into position as I pushed with my hand. |
|
|
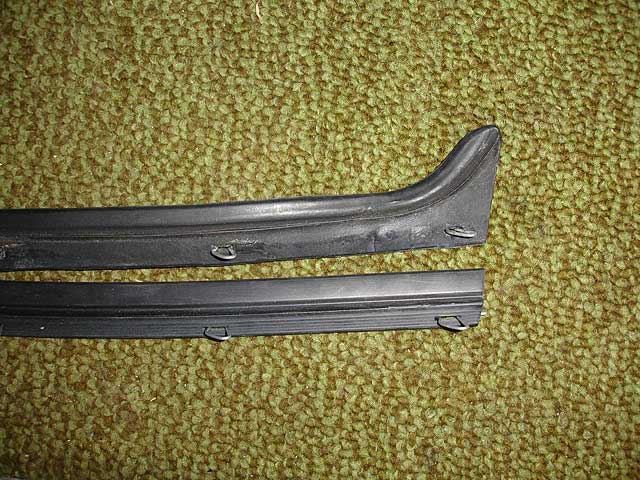
Another problem with the inner scraper is that the profile has changed. Since my inner scraper wasn't in bad shape and on the inside of the window anyway I elected not to replace this part and kept the original. |
|
|
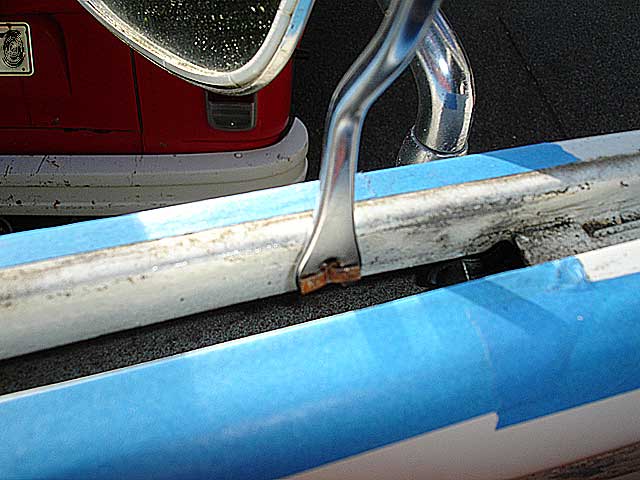
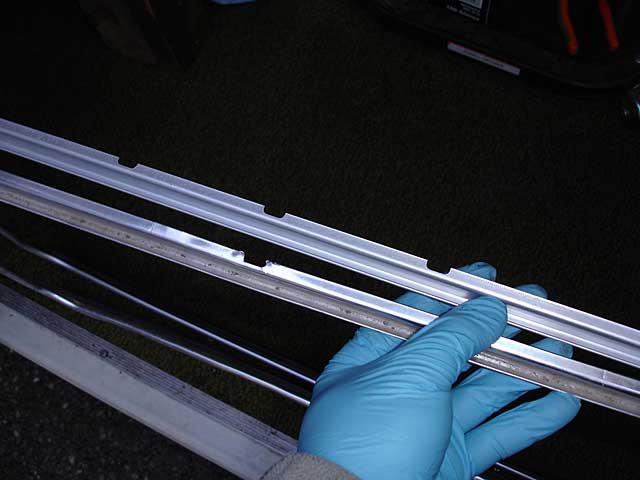
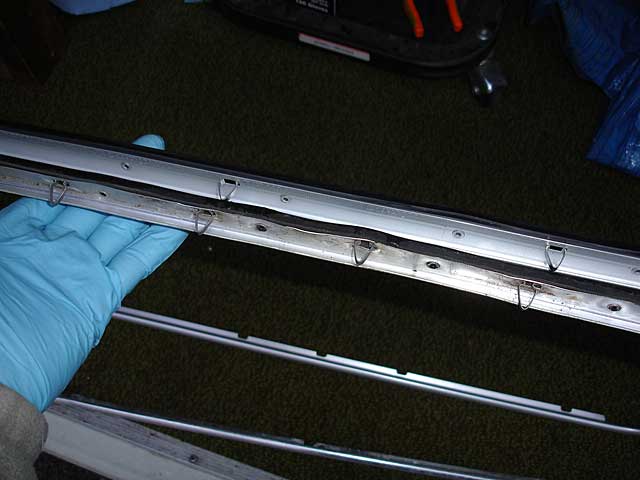
The outer scraper is also different. While the seal is a very good match for the original, the number of notches is different. This probably required more felt channel clips used on the Brazil bus (my guess again) but for us there is a hitch: the lower notch on the side member does not line up with the hole in our door frame. Either, install the outer scraper with one less felt channel clip (not recommended) or create a new notch in the scraper to secure it properly. Since the scraper is made from soft aluminum making a notch is easily done. |
|
|
The outer scraper also has fewer clips than the original. I found that the new scraper fits securely with its fewer clips so this is not an issue. |
|
|
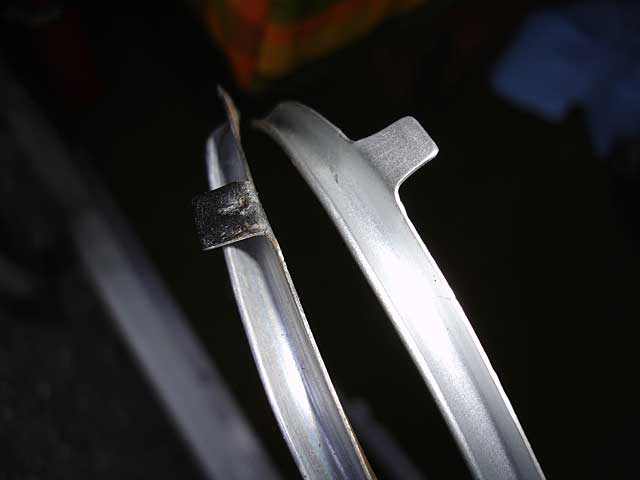
Here's a subtle design difference between the scrapers: this tab at the vent window end of the scraper is flipped around. Both fit. |
|
07/23/09 - Created
07/24/09 - Added some photos about replacement parts
09/08/11 - Fixed broken photos, added translate button, updated footer
07/15/19 - Google update: new adsense code, removed defunt translate button