Windshield Washer Hoses
by Richard Atwell
(c) Copyright 2003-2011
Windshield Washer Hosesby Richard Atwell |
|
One of the windshield washer hoses on my 78 sprung a leak under the steering column right before I decided to get my Texas vehicle inspection last April: what bad luck. I taped it up but I've been lazy in replacing the hoses and no one has been convincing in telling me what the hose size is and I usually get a different answer each time. I ordered some hose from the VW dealer using the part number in ETKA (N 018 057 1) but it appeared to be the wrong stuff (2mm ID, 5.5mm OD) so I pulled everything.
What size is it? Several. It's a trick question!

Click on image to enlarge.
The hose from the washer fluid tank to the steering column valve usually goes bad first. It cracks on the outside because it's under pressure most of the time. The rest of the hoses may not be more durable by construction but end up lasting longer.


The 1978 Owner's manual and the instruction label on the passenger kick panel both state that 42 psi is the maximum inflation pressure however the tank has 35 psi max printed on it. Hmm, who to believe? In yet another variation, I believe the stickers on the US models say 3.0 bar, 43 psi, 300 kPa.
I set it to 30 psi since the hose with the Schrader valve always seems to crack and looks on the verge of leaking.
A word of caution: do not attempt to inflate the tank without a pressure regulator set to 30-35psi. The air volume of the tank is quite small compared to a tire, it fills up quickly and it's quite easy to blow off one of the old hoses.
VW goofed when they made the washer system for the bus. What are you to do when the pressure drops? When I'm driving in the snow I go through a lot of washer fluid as I drive (doesn't it snow in Germany!). The beetle had the solution: attach the windshield washer tank to the spare tire and have an almost endless supply of air pressure for the tank until your tire goes flat (better add the spare to your service station checklist beetle owners!).
The real solution is an electrically powered pump driven by the steering column switch (see the essential upgrades link at the bottom of this article) but I've discovered two alternative sources of air over the years.
1. The first one is obvious: copy the beetle and use the air from the spare tire. Because of the location of the spare this is only really practical on a westy but I suppose you could run a hose to the back as well.
The westy has a spare tire box behind the driver's seat but you can also mount a spare tire on the front if you remove the VW logo and install a tire mount. The mount does not use the bottom hole which is perfect for fitting an air hose through and running it to the windshield washer tank. Neat!
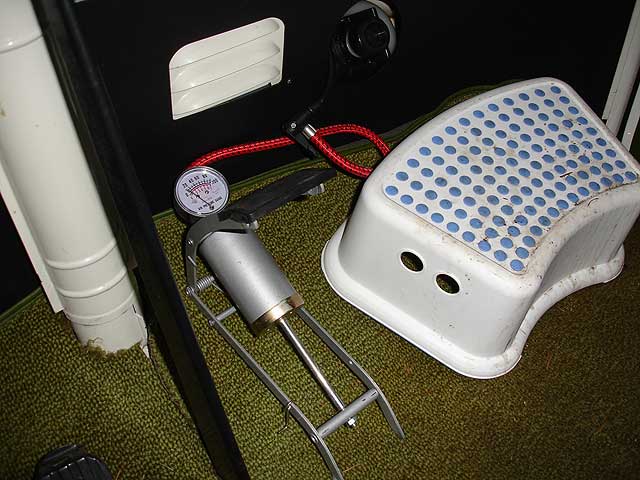
2. The second solution is something I came across by accident. My dad always kept a foot pump under the back seat just in case you have a slow tire leak. Well, if you've ever tried pumping up a tire with one of those pumps takes ages so I carry a battery powered pump that only takes a few minutes to put 40psi into a tire.
I repurposed the foot pump as a passenger/driver activated air pump for the washer reservoir (bored at a stop light - pump pump pump). I can read the gauge from the driver's seat and it only takes a few pumps to get it up to 30 psi (the tank is quite small). A low cost simple solution that works great on long trips.
I believe all these parts fit 73-79.
| Description | Part number | Quantity |
|---|---|---|
| Spraying jet with gasket (5mm OD) | 211 955 993 | Pair |
| t-piece (5.5mm OD) | 175 201 829 | 1 |
| Mist valve (5mm OD) | NLA | 1 |
| Hose nut | 113 955 481 | 2 |
| Air valve hose | 311 955 455A | 1 |
| Fluid tank (holds approx 1/2 gal.) | 211 944 453B | 1 |
| Cap | 311 955 455A | 1 |
| Securing Nut, left | 311 955 461 | 1 |
| Securing Nut, right | NLA | 1 |
| Hose - Tank to valve | 4mm ID, 7mm OD | 1.75m |
| Hose - Valve to T-piece | 2.5mm ID, 6mm OD | 67cm |
| Hose - T-piece to left nozzle | 2.5mm ID, 6.5mm OD | 25cm |
| Hose - T-piece to right nozzle | 2.5mm ID, 6.5mm OD | 68cm |
Hose totals: 1.75m of 4mm hose and 1.60m of 2.5mm hose.
The valve in the steering column fails and water will leak in the steering column. You could complain about this design but you might as well start with the fact the system isn't driven by an electric motor to being with! Save yourself some hassle and cut the hoses to the valve to be 10cm longer than spec. This will allow you to remove the steering wheel and pull out the valve for replacement more easily.
Those hose sizes match commonly available SAE sizes (5/32" and 7/64") but all the original hose ends were pretty stretched on the plastic bits which have a larger OD and the original german stuff looked kinda wimpy as was evidenced by the cracks where the leaks sprang. The section of hose in the steering column showed the most stress. This is unfortunate since this is where important electrical connections are placed. Unable to find a VWFLAPS who carried anything suitable (all suggested 3.5mm braided vacuum hose) I hit the local FLAPS.


The local FLAPS carries generic brand washer hose in those blue bins and 6ft. lengths in clamshell packaging. I didn't like the look of it, soft and powdery on the outside so I checked the Goodyear website and I found some really good hose. Find a dealer using their website and get 12 ft. of 5/32" (part #65111), it's heavy duty and should be about $5 (actually better price than the junk at FLAPS). The original hose has a smaller diameter and stretches more but this stuff fits just as well. You'll have to use one size hose for the whole system because it doesn't stretch as much as the german hose but that's ok, all the plastic bits are the same size. If you go any thicker than this hose you'll have difficulty securing it to the body where it's supposed to go.
Like most washer hoses I found, this hose fits all the plastic bits but it won't fit through the nut that connects the to the fluid reservoir because it's 8.4mm OD. You'll need to make the hole in the nut bigger in order to get the hose through. Remove it and use a 5/16" (8mm) drill bit to widen the hole. Be sure to measure the OD of the hose you get and use an appropriate bit otherwise the nut won't fit snugly and be able to hold the hose on.
I've since found another supplier for hose: OEVeedub. They carry this item:
I've fit their hose to the tees, the washer nozzles and the valve and it's a good fit. The part number they give matches ETKA. When I tried to order the same number from the VW Dealer I thought I received the wrong hose. At first glance it looks to be way too small for the washer valve and nozzle but it's the identical size to the hose that comes with a new German windshield washer switch from SWF. I have to assume now that the factory heated the hose end to expand them and then they quickly shrunk for a tight fit on the nozzles. Ingenious.
Basically the reverse of removal, but here are some tips.
First, cut the necessary lengths and attach the nozzles to their hoses. Feed the two nozzle hoses from the outside and thread them though the body where they are supposed to go. It's only slightly easier if you remove the glovebox and partially remove the instrument cluster.
Save yourself a lot of grief: take out the glovebox and remove the top part of the dash. There are only 6 nuts holding it on from the inside and the first two hold the passengers handle on the dash. Use a small 10mm wrench for the nuts. The phillips screws along the top are easy ones barely worth mentioning. Perhaps it's been a while since you looked behind there anyway to see if any rust is coming through. Maybe you don't want to look. ;-)
Connect them to the tee and join them to the valve output hose. Secure the nozzles to the body: they should quietly snap into place. Along with the fluid reservoir hose, feed both hoses into the steering column. If each hose is too thick you may have to find a unique path through the column for each hose. Attach the hose to the valve and secure the valve to theturn-signal/wiper-switch then reassemble the steering column and dash.
So far so good: the hose is strong and holding up under pressure. It's shooting the water way over the top of the van so a little aiming of the nozzles is in order: the rubber seals on the new ones haven't flattened yet.
02/22/03 - Created
02/27/03 - Added information about non-metric alternative hoses
06/13/03 - Added OEVeedub as another hose supplier
01/06/09 - Added info about foot pump
09/05/11 - Fixed broken photos, added translate button, updated footer
07/15/19 - Google update: new adsense code, removed defunt translate button