VW Baywindow Bus - Fuel Tank Restoration
by Richard Atwell
(c) Copyright 2003-2020
VW Baywindow Bus - Fuel Tank Restorationby Richard Atwell |
|
Disclaimer: chemicals are dangerous. Use appropriate precautions when dealing with them. I assume no responsibility for the actions taken from reading this account of my own cleaning experience.
So you're tired of changing fuel filters, cleaning re-usable ones or can't get any fuel out of the tank, period. Face facts: you need to pull the fuel tank from your bus and VW didn't make it easy by putting it in the engine compartment behind a firewall. If you have a single or double cab VW put a door to the fuel tank in the belly compartment. Of course the luck of having that door is totally negated by the fact the rest of your VW is even more rusty than the average bus. :)
Even replacing the fuel sender is non-trivial unless you are inclined to cut into the body of your bus.
Fixing your fuel woes sounds harder than it really is, but you just need a place to store your bus, a few hours of time, a friend to help you drop the engine, some chemicals and a place to dispose of them.
I was reading through the Bentley CD-ROM that came out recently and I came across an old VW procedure for cleaning a Type 3 gas tank. This is the same advice printed in the 68-79 Bentley on page 6 of Fuel System. I went through a similar procedure for cleaning the tank from my 78 Westfalia but because it had been sitting with five gallons of gas for four years under the Texas sun the task was more involved. Here's how I cleaned mine.
Note: All part number references are valid for 76-79 FI model years only. Check for the existence of 72-74 specific numbers and any middle model difference if you have an automatic 74 FI CA bus or an early 75 model.
See my Fuel Hose article as well.
See the links in the references at the end for a complete parts manifest required to replace ALL fuel lines and clamps.
If your bus isn't fuel injected you will need less 7mm hose (about 1ft or so to get from the tank to the fuel filter or the Type 4 fuel pump).
Most U.S. automobiles of air-cooled vintage used steel fuel tanks made from a steel that is covered with a tin lead alloy in a process called terne plating. This rustproofed the interior and also helped to protect it against salt and other corrosive agents creating a fuel tank that would last the life of the vehicle. Another term you may come across in your Google searches is Ni-terne. This is steel that has been flash coated with Nickel prior to the tin/lead coating to provide an extra layer of protection. Apparently, the original terne plating technique used can cause the plating to slowly dissolve in the presence of oxygenated fuels and clog the fuel system so maybe it's luck rather than by design that we don't have other problems. Of course, terne being lead based is environmentally unsound.
For some reason unknown to me, VW chose not to use terne plated steel for their fuel tanks. Of course a lack of Helium never stopped the Germans from making flying bombs so why be bothered by a lot of rust in a wet country? Even though it was evident when they published their fuel tank restoration advice in their workshop manuals that tank cleaning was a concern, they continued the practice of installing their unprotected fuel tanks into every air-cooled VW made.
1. The POR-15 is worth every penny. If you don't think the $50 investment is worth fixing your tank for the 25 years or more and you're looking for a more economical sealer be advised some of them do not work and will cause more problems than they solve. This sealer turned into a plastic film and peeled off the inside wall of the tank:


I can't say whether or not the sealer used was applied incorrectly or not but I've never had a problem with POR-15 during the 3 times I've used it. POR-15 turns into a non-porous rock hard finish that's resistant to fuels. It's the best.
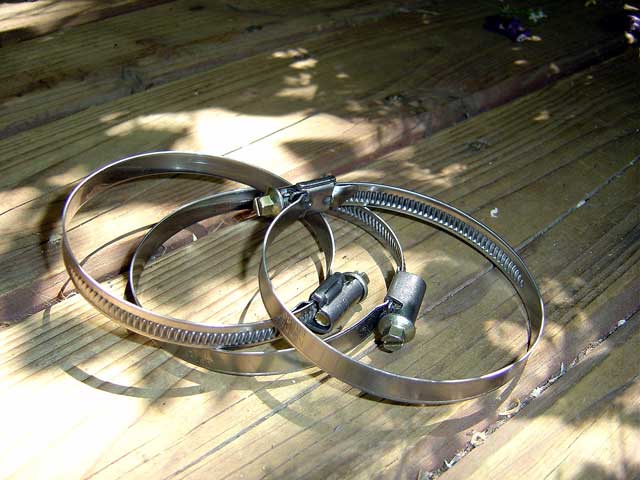
2. Do not use cheap worm gear clamps. Use the original clamps or buy new clamps that have a flat band and turned up edges that won't damage the hose they are clamping. If you harm the hose, especially the rubber filler neck you are going to have a nasty leak in future.

The first step is to decide how you want to clean out the inside of the tank. Some people opt to take it to a radiator shop and have them "boil it out". This leaves the inside and out as bare metal that will start to rust right away and at the least requires the outside to be repainted VW black again. If you are lucky you'll find a radiator shop that will charge a reasonable rate. I didn't so instead I opted to do it myself for $50 worth of chemicals. VW's outdated advice recommends coating the tank with mineral oil and using chemicals that you'll probably have a hard time finding anyway.


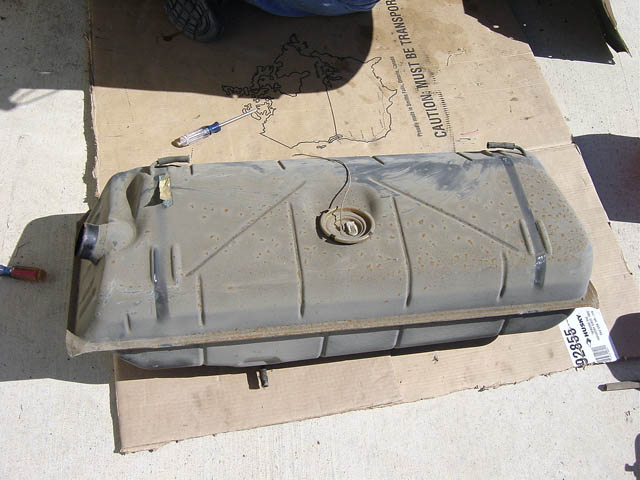
Before you can clean the tank you need to remove as much of its contents as possible. The tank is pretty heavy even without any fuel in it, so you'll need to drain any fuel before you remove it. Undo the clamps and take off the hose that goes between the filler hole and the filler tube. Whether or not your tank is clogged at the fuel outlet, get a $2 plastic fuel siphoning pump from the local auto parts store and drain it into another container from the filler opening to help contain any spills. The gas will probably stink and be discolored. Contact your local recycling program to determine where to take the gas.
Disconnect the two wires from the fuel sender on the top of tank. There is a brown ground wire that screws to the top of the fuel tank compartment to ground the sender. The other brown wire is covered in a black plastic jacket and leads to a grommet hole at the back and to the right.
To undo the tank straps, unbolt them from underneath the body. Like unbolting the transmission, that task is easier as a two person job. Undo the breather lines on top, remove the tank and clean away all that vintage dust.


For some reason, VW stopped putting a seal at the bottom opening of the fuel tank bay in 1968. There will probably be a lot of dust and rust in the fuel tank compartment that you'll want to take care of before reinstalling the tank.
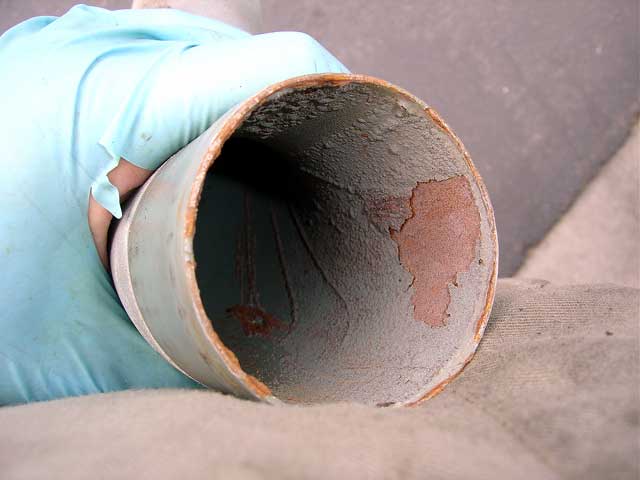
Take off the fuel sender. It comes out with a counter-clockwise twist but you'll probably need to tap it with a screwdriver and hammer to get it to rotate. The condition of the fuel sender will give you an idea of how rusty the tank is inside. There is an o-ring (113 919 131A) under the sender that you should replace if you decide to re-use your sender because it cracks. New fuel senders come with new o-rings.

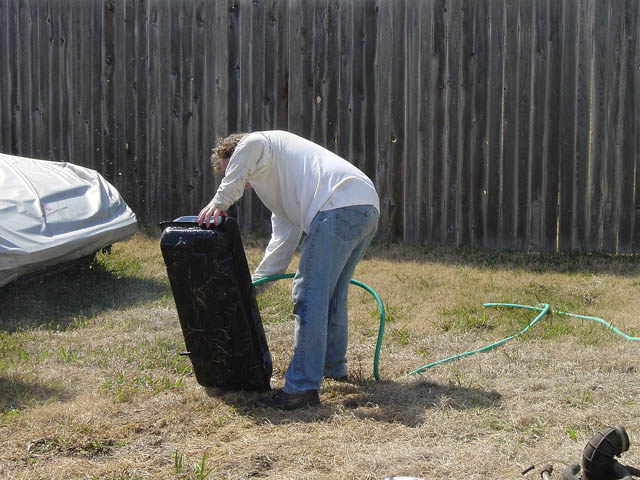

Arg--rust, varnish and who knows what! Start by washing the tank out with a garden hose to remove all loose objects in the tank. Get it as clean as possible using just water. There will be a lot of rust inside, so use a chain and roll it around inside to loosen as much rust as possible. Rinse and repeat until you believe no more will come out.


The inside of your tank will at least be rusty, but it may also contain sludge or varnish from the "decomposing" gasoline. You may find something that fell in through the filler neck, who knows. If gas was sitting in your tank for several years, you'll probably find a tar-like sludge inside. (Some of it was made into that ball in the picture and letting that ball of goo sit overnight demonstrated that it was basically a molten glass like liquid that oozed, very slowly, into your fuel lines.) Don't unclog the fuel outlet and return line on the bottom of the tank just yet; we'll do that after all the washing is complete.
To get all the rust out of the tank will require some acid. Buy one gallon of muratic acid from the pool cleaning section at Home Depot. It will be $3/gallon or so and much cheaper than the same acid you may find in the concrete cleaning section. This acid is pretty strong so you should take every precaution. Wear some eye protection in case of any splashes. Wear your old clothing if you haven't put it on already. You'll get the chance to have those acid wash jeans you were too embarrassed to wear in high school. Wear long sleeves and pants and use rubber dish washing gloves. It is so strong that you should never store it inside because it will give off vapors and try to rust everything metal in your workshop within two days.
Fill the tank with enough water to slosh around (a couple of inches), then add a cup of acid. Always add acid to water. If you do it the other way around the acid will splash and it will give off gasses: you don't want to have the fumes overcome you or burn your lungs. As you can see from the pictures, everything was accomplished out in the backyard where the air circulation was good.
Let the acid do its thing and watch it "steam". Slosh it around to get it in contact with all the rusty parts and then dump it out. You can put in some baking soda to neutralize the acid before you dump it, but I found it just made a mess on the grass and the acid will only buffer the soil, that's all. What you pour out will be slightly orange in color from the iron in the rust. Do it on a patch of already dying grass, if you can. ;-)
Repeat this step until your wash starts to come out fairly clean. Fill the tank to the top with a weak acid solution and let it sit overnight. By weak, I mean fill up the tank with water and add half a gallon of acid and shake well.


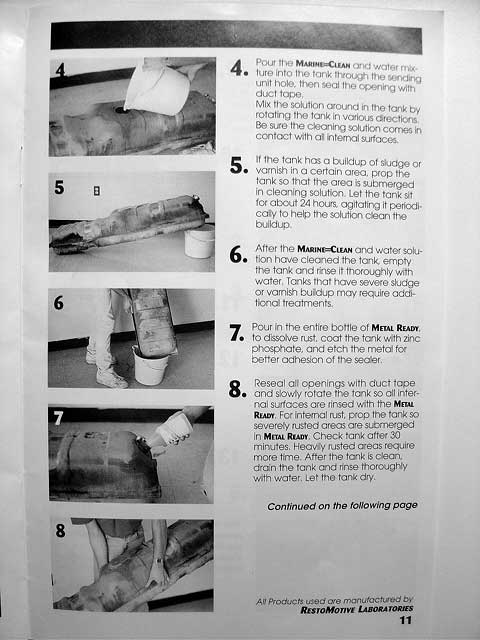
The next morning the tank may look like this after you rinse it out: pretty clean where there was rust and where there was sludge, grayish goo discolored by the acid. Now you'll need the POR-15 restoration kit. The kit consists of 2 quarts of Marine Clean and 20 oz. of Metal Ready (now called Prep & Ready) , one quart of US Standard Tank Sealer and a bottle of their fuel stabilizer. In my opinion, you don't need the stabilizer (never let your VW sit again!). For the same price as the restoration kit you can get 1 gallon of Marine Clean instead of 2 quarts, if you drop the stabilizer. If your tank is really full of sludge you will need a lot of Marine Clean. You can dilute it 10:1 with water as advertised but the weaker the solution the longer it will take.
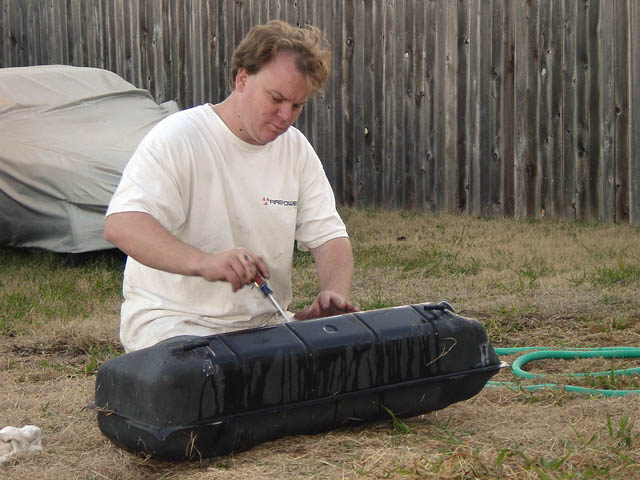
All of the tank openings will need to be sealed up with duct tape. Take the fuel hoses off the tubes on the bottom of the tank and poke up something to clear them. Put the hoses back on and plug them up with bolts. Make sure the ones on top are clear also.

Following the POR-15 instructions, fill the tank up with one quart of Marine Clean diluted with hot water, seal it and let it sit. You want to get it to contact the entire inside surface of the tank, so fill it up to the top and rotate the tank every so often. I looked up the MSDS sheet on Marine Clean and it says it's microbial (it eats the sludge) and environmentally safe.


The degreasing process takes a while, which I've illustrated here. The first image was taken 24 hours later. You can start to see the nice clean metal of the tank bottom under the sludge and the sludge is dripping off the walls and ceiling. The second image is 60 hours and another quart of Marine Clean later. The third image is after 2 more quarts of Marine Clean and another acid wash: there's not much contamination left, just clean metal.


There are a lot of surfaces around the bowl that is inside the tank. The bowl is there to keep fuel from sloshing around during sharp cornering (in a bus, ha!). Make sure you are getting it clean there. At this point you need to unclog the sludge from the fuel pickup and return lines on the bottom, then seal them up again. Eventually your hard work and patience will pay off and you'll end up with a very clean tank.


If you've just came back from the radiator shop with your boiled-out tank, you're ready to join in. You need to make sure you've got it rust free on the inside and the two tubes on the bottom need to be clear of obstruction because they will seal up with the sealer and you'll need to be able to easily poke them through again. Cover the fuel sender hole and leave open the fuel filler hole to pour in liquids.
Sealing the tank is a two step process. First use the Metal Ready, which "gently etches metal, creating an ideal anchor pattern" for the tank sealer, "while simultaneously leaving a zinc phosphate coating to insure chemical bonding of paint and steel". End sales pitch. You need to coat everywhere on the inside with Metal Ready, wait the 30 min. elapsed time, then dump it out and making sure it's dry inside before proceeding. A white film will form which is the protective coating it leaves behind.
You can re-use the Metal Ready over and over. Just filter it with a coffee or similar filter and seal the container it came in.
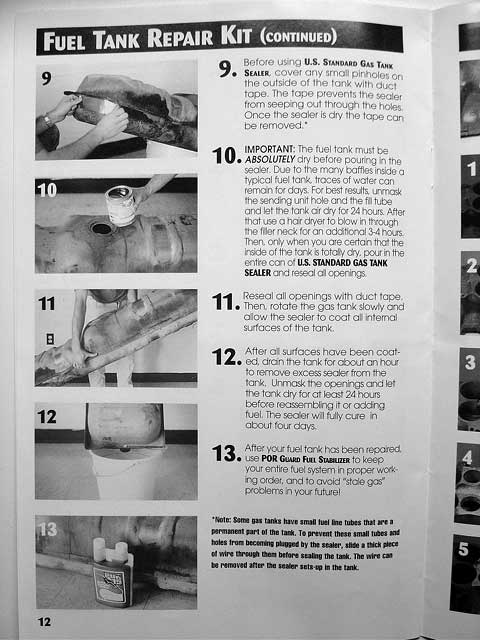
The POR-15 instruction say to wait 24 hours to let the Metal Ready dry. When it's ready, pour in all of the tank sealer. An entire quart may seem like a lot, but you will be making sure it's coated everywhere. You still only want one opening unsealed so you can coat it everywhere. Take a good look inside and whatever doesn't want to stick to the sealer is excess that must drain out completely.
You only get one shot at using the tank sealer. Do not try to do two coats or it will blister inside when it dries. The night before you are going to perform this procedure invert the can of tank sealer to release any sediment at the bottom. The sealer is activated by air and doesn't like to be stirred too much and never shake the can like a normal can of paint to mix it: it will aerate and you won't end up with the ideal protective finish. It normal to see some streaking as you stir the paint in the can. Do not try to stir it until the streaks go away either: they are just the paint mixing with the metal particles. Finally, once the tank sealer can has been opened it has been activated and you'll have to throw away what you haven't used. If you want to ignore this advice definitely do not try to re-use any sealer that's been contaminated by touching metal.
It will take a while for the tank to dry in your garage. If it's cold outside, it will take a long time and you may need a hand held drier to speed the process along so be warned that it can take 4 days for the sealer to full cure and I would wait that longer before putting any gasoline back in the tank. No point in rushing any of this work. POR 15 is activated by moisture so the more humid the weather the better.
When you're done, give the tank a new coat of paint so it'll last another 25 years and it will be better than when it left the factory. Check that the two breather tubes and both bottom tubes are free and unplug them if necessary (the sealer will clog them and since the sealer goes rock hard you may have a difficult time opening the holes because the tubes are curved). Make sure the holes are open BEFORE you leave the tank to dry. If you put the engine in and the fuel pump reads zero psi on your fuel pressure gauge, you can be sure you've got a clogged outlet. If you're reading 100 psi of fuel pressure you can be guaranteed that you've got a clogged return line.


If your fuel tank was full of sludge, the fuel lines were probably clogged also. You'll need to replace the rubber ones and clean the metal ones. It's a good idea to replace all the fuel lines anyway to prevent unwanted engine fires. Use Continental 7mm high pressure fuel line. Get the reinforced stuff, not the vintage-looking hose with the braided covering.
Remove the gas cap, take off the retainer ring and inspect the filler neck. It's 25 years old and although it may look ok you don't want it to crack after you've put the tank in, so replace it now. The filler neck for 74-79 busses is finally available again as a reproduction item. Any of the online VW parts vendors carry this part. To get it out, remove the round black plate that covers the ECU and then remove the ECU to ease access to the filler pipe. Put the filler neck in from the outside and remove it along with the pipe. Take note of the position of the old filler neck on the pipe with a marker in order to orient the new one the same way so it will line up properly without much effort.
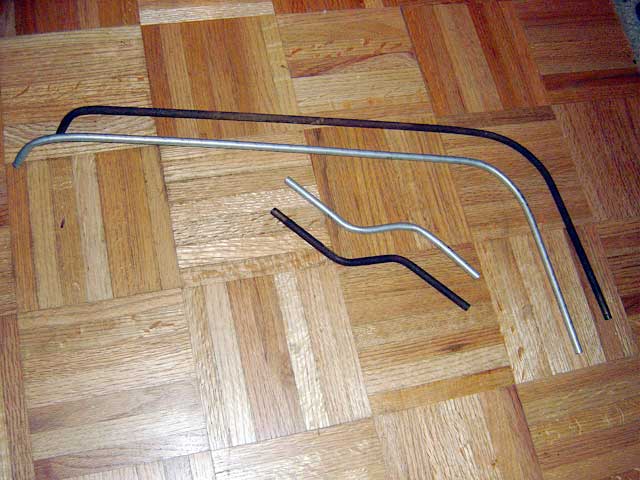
Replacing all the old rubber items while the tank is out is a good idea, especially when you can see cracks. A replacement filler hose needs to be fabricated because the original is NLA (curse you VAG!). The tricky part is figuring how to cut a straight piece to fit like the molded hose. Start with the 1 ft. of hose you bought at NAPA and cut off a 4 1/2" piece. You'll need to cut it at an angle so that the short side is about the same length as the short side of the original piece. Take your time and if you end up making an ill-fitting piece, you'll still have more of that NAPA hose left to start over again.


The metal filler pipe may be in a rusty state especially the piece near the tank opening. My recommendation is to use the rest of the POR-15 to coat the pipe and seal it the same way. Since you can't re-use the sealer, save a little that you would have put into the tank and poured away and do the filler pipe at the same time. Repaint the outside while you have access to it.


Now you're ready to put in the new fuel sender. First, check it with an ohm meter. It should register 10-70 ohms as you sweep the float. If your old sender was shot don't be surprised if your fuel gauge still isn't working when you fill up for the first time. You may have a problem with the fuel gauge or voltage stabilizer attached to the back of the speedometer. Use the above link to diagnose the problem. The fuel sender is oriented such that the float faces away from the filler opening. Use a little o-ring lubricant on the seal to help make it last longer and seal better.

Don't forget to hook up the wiring before putting on the firewall! A little di-electric grease will keep the connectors nice and oxidization free for years (at least until the sender craps out again).
Before going any further, be sure the fuel tank's breather tubes and fuel inlet and outlet on the bottom are not accidentally closed from the use of tank sealer.


Put a clamp on the filler neck first and feed it into the filler opening from the inside. It's easier this way and you can pull the flange of the filler neck through the hole in the body.
Partially seat the tank in the fuel tank compartment and hook up the fuel sender to the ground wire and the other wire that goes to the fuel gauge. Strap the tank down, and with a helper holding the filler neck from the outside by the filler opening on the body, fit the hose that you cut. Feel around the back of your hose and make sure you've got a good fit with the tube and the tank. If you aren't confident, trim the hose some more until you get it right. Once you've got everything all lined up, check the fuel filler neck to see if the holes in the rubber meet up with the retaining ring screws, adjust if necessary and secure it.
You are almost ready to put the firewall back. Replace both rubber hose pieces that attach to the top of the tank via the plastic yellow breather tubing. Two are on the tank that you took off earlier and can be difficult to remove. Be careful as you don't want to break any of the metal tubes on the tank. While you are in there, replace the other two rubber sections that are part of the fuel vapor recovery system. They are just out of view but within reach. That breather line is 7mm ID and 12mm OD. Use the rest of the 7mm hose to replace the lines going from the tank to the charcoal filter behind the battery and don't forget the piece between the tire well and the body in the engine compartment behind the driver's side tail light.
If your fuel tank was sludgy, chances are that you got some kind of contamination in other places:
VW used 8mm OD hard fuel line from the tank to the filter and from the pump to the 3/4 fuel rail. The sludge I had in my tank clogged the longer of the two hard lines. I still haven't been able to remove it (I'm considering using very hot water).


The original copper tubing is close enough to 5/16" brake line that you can use that as a replacement. If you use hose you'll have two problems. First, it's a more hostile environment under the bus and the rubber hose will go hard much quicker that the hose in the engine compartment. If you ignore my advice and get 5/16" hose from the local parts store instead of 7mm German made Nitrile (NBR) hose you should inspect it every year especially if you live in a climate with cold winters and hot summers. The hose will go hard and crack before you realize it.
Second, you'll have to find a way to support the hose. The original hard line was secured to the body by two clips (similar to the clips on the engine tin that hold the spark plug wires in place). One solution, which my friend came up with is to use the bolt sized holes in the bottom of the fuel tank compartment to secure a pair of rubber padded clamps to hold the fuel hose.
Even though the hose or hard line may look good to the eye, as fuel is left to sit it will end up varnishing the inside wall of the containing vessel. Brake fluid will do the same thing. Once the flow of fuel starts up the varnish will flake off and end up in the fuel filter. Some of it will dissolve, some of it will clog the filter. Take the opportunity to throw away all the old hose and clean the hard lines with brake cleaner.
Don't even think about not changing the filter after a tank cleaning. You'll feel stupid getting stuck because of a $5 part when you could be driving thousands of miles care free instead. Buy a fuel hose clamp to help you change the filter on the road in the event something you have to change it on the road.
The pump is protected by the fuel filter so chances are that there is nothing wrong with it. Some busses have the 010 Bosch pump from the FI super beetle and others the 016 replacement pump. The test procedure for the pump says to run the pump for 30 seconds once fuel starts flowing from the outlet and measure the volume of fluid. The test procedure says that the minimum should be 1L/min but in my experience a healthy pump puts out 2-2.5L/min.
The pump should have a screen in the inlet as a backup for the filter. This may be dirty. You can't run the pump in reverse by connecting the leads the wrong way because there is a check valve to keep the fuel pressure high after the pump has been shut off so use a toothbrush or something that won't tear the screen to clean it by hand.

|
If your tank had a sludge problem, by the vary nature of the location of the pressure regulator, it will have a sludge problem also. This is one of those $65 FI parts that lasts a long time if not abused. You can test the pressure regulator as part of the fuel system to see if it will hold pressure after the pump is shut off. Since any pressure in the fuel rail will overcome the pressure of the fuel in the tank it will be obvious if it's not working. You also need to test the vacuum port to see if the fuel pressure drops 7psi for 15" of vacuum. |
The CSV is only in operation for a maximum of 8 seconds of not at all above 35C (95F) so it's basically only used for starting the engine when it's cold out and the engine is also cold. You can test the valve once you wrestle the bottom screw out of the plenum that holds it in place along with the top screw. You may see some crusting on the end especially if you've been running an EGR valve but otherwise the CSV is pretty sturdy. If the fuel rail pressure drops you won't be sure if it's the CVS or the PR unless you watch for leaks.
Volkswagens are no fun to drive when they have fuel delivery problems. Sort them out and enjoy the ride the factory engineers designed for you.
Got gasoline? Oil level normal in the engine and transmission? Alternator belt adjusted? Everything hooked back up? No backwards wiring at the coil? (Don't fry your Pertronix). Battery charged? Put the engine back in, give it a complete tune-up and go for a drive knowing you're fuel/rust problem free for the next 25 years (or at least until you put in diesel by mistake on your next road trip).
Since I wrote this article I've been asked two good questions:
02/15/03 - Created
06/18/03 - Follow-up questions 1 and 2
03/22/04 - Added POR-15 scans
04/12/04 - Corrected the breather line from 9mm to 7mm and added Gotchas
04/29/04 - Added POR-15 tips and filler pipe pictures
05/03/04 - Added photos of inferior sealer and hose clamps
09/14/04 - Added caution about sealer clogging fuel inlet/outlet
09/05/11 - Fixed broken photos, added translate button, updated footer
07/15/19 - Google update: new adsense code, removed defunt translate button
10/20/20 - Moved fuel injector cleaning info here