Comprehensive Engine Inspection
by Richard Atwell
(c) Copyright 2004-2011
Comprehensive Engine Inspectionby Richard Atwell |
|
The general consensus is that the average bus will cost you $5000 one way or another. Your goal is to minimize the unforeseen expenses and having the vehicle inspected is paramount to that goal.
Bodies are fairly easy to inspect. You are looking for rust and signs of hidden repairs. If the rear axle beam is rusted, walk away. Pretty much anything else is salvageable. Even if the front axle beam is rusted all is not lost if you are still able to find a good used one or buy a new one for $400 USD (availability is spotty and the price is always rising). Brakes can be replaced and so can steering and suspension components that eventually wear from use.
By far the biggest cost and risk involves the engine. When you buy a used bus and forgo the engine inspection you are gambling your money away. If you are buying an eBay bus then you'll have to take your chances. This will add another $1600 for a rebuilt engine from AVP or so by the time you install it. Having a mechanic do it will double that price. If you are buying locally spend the money on a pre-purchase inspection.
VWs being air-cooled have a fatal weakness. Unlike a water cooler vehicle that has a temperature gauge on the dash to warn you that you may boil the radiator over, there is no equivalent cylinder head temperature gauge on the dash of any air-cooled model that VW sold. It would be wise to install an after-market gauge asap to prevent future unwanted meltdowns.
Before you think this is something that won't happen to you keep this in mind: this aircooled engine was designed in the 30's and the Porsche engineers decided the top speed and the cruising speed would be the same and set to 100 km/h (60mph) on the yet to be built Autobahns. Today's speed limits are closer to 70 mph on most interstates and the difference in head temperature at those speed is about 70F. It's not a big difference in speed but the extra heat reduces the life of the cylinder heads which are only made from cast iron unlike the rest of the engine which is made from aluminum and magnesium alloys. Remember the ambient temperature determines how cool the heads will run. When it's 50F hotter outside the engine temps may up by that much.
If you are not going to tear down the engine right away you have no idea how the PO abused it by driving too fast. Many air-cooled VWs are sold because the seller doesn't want to expend the money to replace the engine he knows needs to be rebuilt. Sometimes they last 500 miles after you buy it, sometimes 50,000.
It is critical that if you expect to minimize your initial purchase costs that you have the engine inspected by a competent VW mechanic that you trust. If you don't know one at least try to get one on recommendation. Try the VW dealer for a reference if they are unable or unwilling to inspect it for you. Remember, that a recommendation from a stranger often leads to to their friends who aren't always competent. Some dealers still have air-cooled mechanics on staff that know what to look for.
Whomever you pick, do not let them give the bus a good bill of health without covering the basics covered in this article. If the basics are glossed over, or critical parts missing, you should probably walk away unless the body is in A1 condition and the price is right.
I'm going to cover Type 4 engines in 72-79 buses because they are the least understood and prone to head failure because the torquey engines easily go 70 mph. Much still applies the earlier models.
You will eventually have to acquire these tools in order to maintain your own bus:
It would be expensive to purchase them all beforehand and some require you understand how to use them but if you can beg/borrow any and bring along an experienced helper who owns the tools you'll be making a more informed purchase. Any bus owner considering a second bus better have a good reason for not bringing along these tools (aka free bus).
Engine seal - Open up the engine compartment lid. Whether or not the bus is FI or running carbs it must have an engine seal. This photo is from a Type 4 bus engine with air conditioner (that's the compressor driven by the engine). The seal is part of the engine design and keeps contaminants and prevents hot air from entering the compartment especially at idle. If the engine is ingesting hot air instead of cool air the engine temperature will increase.
The seal deteriorates over time and it falls off slowly in pieces. They last 10 years maximum before the fall into disrepair. If the seal is completely missing walk away. The engine surely has been subjected to unusually high temperatures and the heat damage is irreversible. You should be particularly wary of 72-79 buses with a/c units installed. The compressor robbed the engine of precious HP and makes the engine work harder (hotter) but even worse the installations leave the engine poorly sealed. These buses may already be on their nth engine.
You are also looking to see if the cooling tin is in place. If the PO has removed it the engine is probably going to be junk. Also look for the muffler heat shield on 72-79 models as it serves to keep the oil temperatures lower by 20 degrees vs. eliminating it.


Cooling system - this particular inspection criteria is the whole reason for writing this article. First, if the thermostat has been expanded it means that the engine has been overcooled at warmup. This is less or a problem in warmer climates and this results in excess cylinder wear that can reduce the cylinder compression.
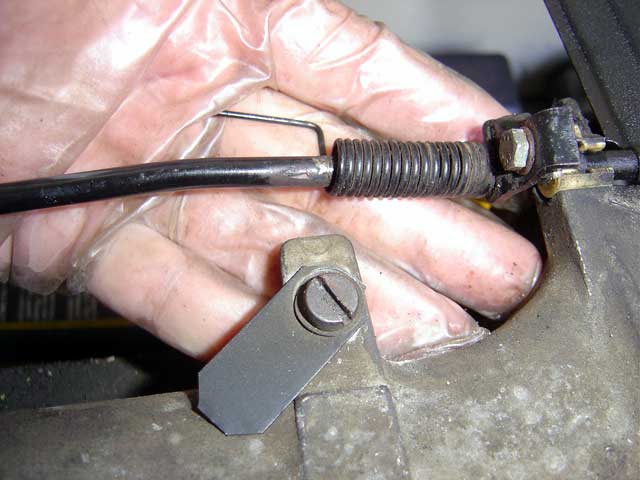
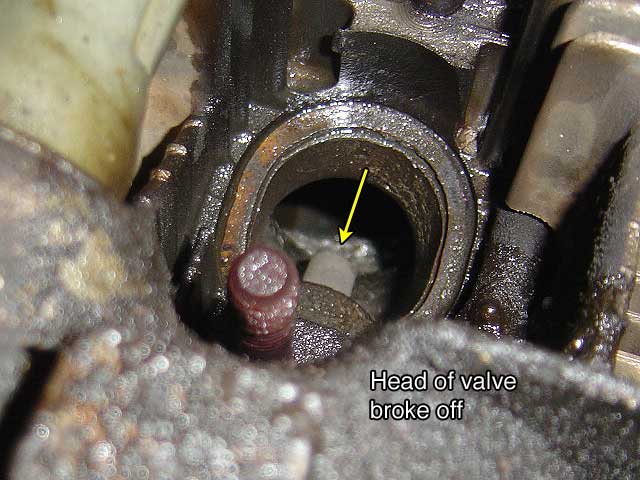
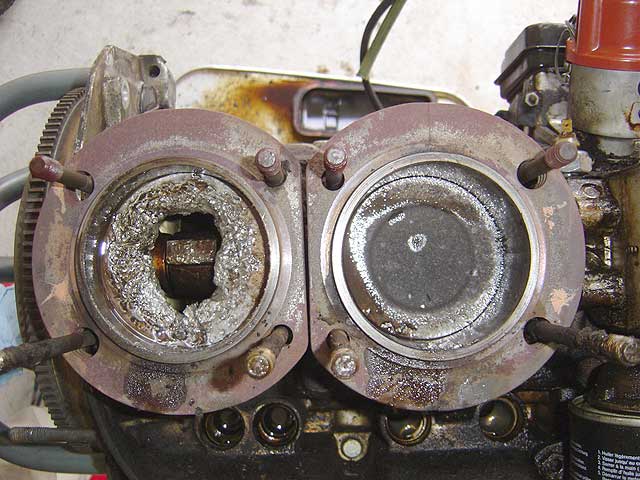
More important is that the air cooling flaps are in the hot operating position. The thermostat is connected to flap by a cable that goes over a pulley underneath the engine. The flaps deflect air over the cylinders and as the engine warms the thermostat expands and the cable moves. This lets the spring holding the flaps in the closed position open slowly as the engine warms. The spring also serves as a fail safe mechanism. If the spring has been disconnected walk away because there is no telling how long the engine has run overheated. When this happens exhaust valves burn up. In all too common cases, the valves stretch, break off and piston and head damage occurs. The flap is also responsible for directing air to the oil cooler. If the flaps have been completely removed walk away because although the cylinders received maximum airflow and endured an extended warmup time, the oil cooler received no airflow at all!
You should not pass up the opportunity to check for rat nest and other infestations that will interfere with the cooling system.


Oil level - Whether or not the bus has been sitting a long time, the seller's memory of the oil level may not match the dipstick. Oil leaks further compound the issue and there maybe oil all over the bottom of the engine caked with dirt. Make sure the oil level is between the dipstick marks with the bus on a level surface and take a quart of 20w50 along on the eventual test drive. The seller will think you're a freak but you're a freak with money so he'll get over it.
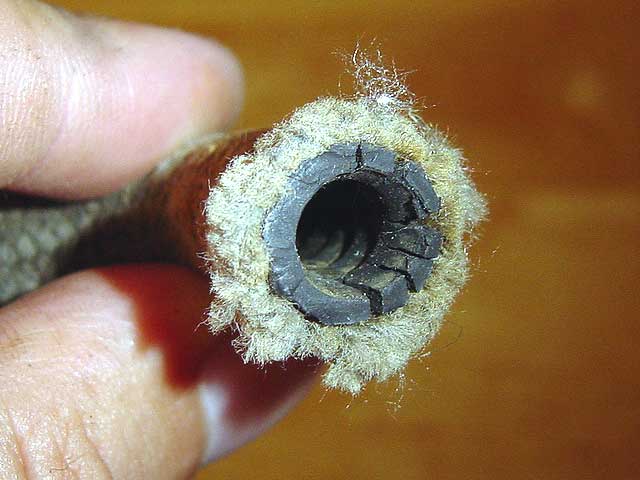
Fuel lines - Buses or any old vehicle may burn down because of old fuel lines, period. Some burn down from ignorance, some from procrastination and sometimes from mistakes. You must perform a visual inspection of the fuel lines. Look for signs of leakage and wiggle the hoses at the connectors where they are likely to be cracked. If they are in danger of leaking a little man handling will help identify problem hoses. Fuel lines that look ok are sometimes cracked upon closer inspection. On a fuel injected bus you can prime the fuel system by turning the key to the on position and deflecting the flap in the air flow meter. A fuel pressure gauge is handy to prove fuel is getting thru.
Carry a spare fuel filter with you in case because they are easily blocked by rust particles from the gas tank. FI filters are square and carb filter are shaped like a rubber stopper.
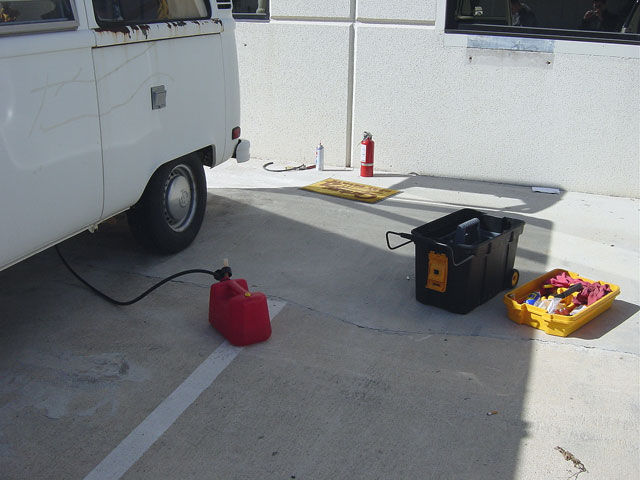
Fuel - gasoline does not last forever. After sitting in the fuel tank for a year it will have mixed with water, changed color and give off a sickly sweet smell. Take a jerry can along with you so you can get some fresh gasoline from the local station rather than attempt to lug the bus over there. Draining the gas tank is not easily done if you don't have large enough gas cans and disposing of it is a hassle. Be prepared for this.
If the tank is full of old gas try to start it and run it briefly. You may need to spray some starter fluid into the carbs/AFM to help it start if the engine has been dormant a long time. In severe cases you can block the fuel line from the tank and run some fuel line from your jerry can to the pump. This will get the engine going but makes it difficult to drive although I've slipped the fuel line through the rear vent window with the jerry can inside to permit a test drive in the past. Take a fire extinguisher with you to prepare for the worst.
Vacuum hoses - Overtime the engine can burn up if the vacuum hoses are cracked or disconnected. The vacuum system is a pneumatic control system for the engine that is powered off the pumping action of the pistons. It's also used for the brake booster on models with disc brakes. If any hoses are missing or disconnected, unwanted air (often called false air) will enter the combustion chamber. This has the effect of leaning out the mixture (giving it more air than the air it metered fuel to) which increases the head temperature. This requires a level of knowledge to recognize what hoses should be present so bring along your Bentley manual for reference and print out the vacuum hose article from my website.
Tires - Low tire pressure can make the bus unnecessary difficult to steer and put on an unwanted drag the engine. Eliminate any guessing by inflating the tires before you drive. It seems like an insignificant factor but it makes a big difference.
For the engine to run you need air, fuel, spark and compression. Those are the basics.
Battery - Chances are the battery is weak or dead on the bus you want to buy. Inspect the terminals and the fluid level (if not sealed) and test the voltage output. If it's 11V or less then it's unlikely that the battery will start the engine. Bringing along your own Group 42 battery is one possibility but a pair of jumper cables is easiest. Be sure to follow these jump starting guidelines. When you start the engine look for the battery light on the dash to go out.
Spark plugs - Checking the spark plugs before starting up the engine would be useful to see if there has been any damage or fouling or overheating. You also want to make sure they are gapped correctly. For any bus there is a risk of stripping the threads in the head because the plug threads are nickel coated steel while the threads in the head are aluminum. Problems occur when the spark plug has accidentally been cross threaded and while it would seem easy to put back in, there is a risk the combustion pressure could force it to shoot out during the test drive. If the plug hole has been repaired improperly you might even pull out the insert accidentally.
If you want to inspect the plugs and they do not want to unscrew easily leave them alone. Under normal circumstances, you should be able to break torque on them but may feel resistance removing them because of corrosion in the threads. You'll often find that a little oil on the threads eases installation. Only torque them hand tight if you are going to perform a compression test later. Be sure to ask the seller if there has been any thread repair in this past because repairing the spark plug hole with the engine in the bus is a royal PITA (it's easier to drop the engine which is also expensive and time consuming).
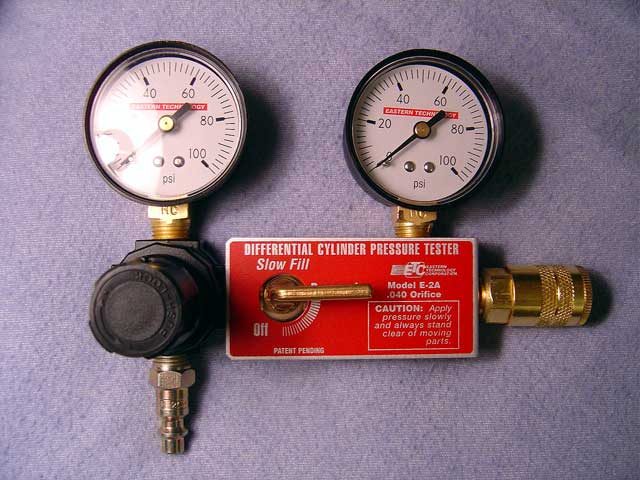
Leak-down test - A leak-down test will tell you the condition of the engine's power making ability before you try to start it up. You need a compressed air source which makes this test inconvenient unless you have a small portable unit and a beefy outdoor extension cord. The test will indicate whether or not the engine has a problem making power before you start it up. Air leakage past the piston rings (air loss via the oil filler tube), the intake valves (through the carbs/s-boot), the exhaust valves (the tailpipe) or even the head (sealing problem) is easily felt by hand and read on the gauge. Results should indicate no more than 10% pressure loss from each cylinder on a good engine and there should be very little variation between cylinders. A new engine will leak 3-5%.
I find the hoses that come with the leak-down testers difficult to thread into the spark plug holes because of the length of the hose. It's always bent from the packaging it came in and doing #3 by the firewall is a pita. I use a homemade adapter made from a cored spark plug. Simply screw a female 1/4"-NPT air coupler fitting onto the end. It's rigid and the gasket seals much better than the hose with it's o-ring so your readings are more accurate.
The next best thing to this test is a compression test described in the next section.

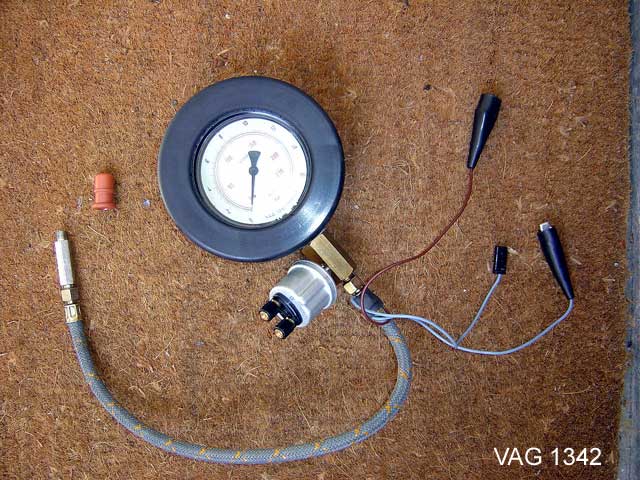
Oil pressure - Testing that the engine can build oil pressure will prevent it from seizing after startup. It's also an indicator of bearing wear because the oil pressure drops as the wear increases. The gauge threads into the 10mm plug where the oil pressure switch is located behind the distributor. Since you don't want the engine to start you'll need to disable the fuel and spark. The best method involves using a remote switch on the starter and disabling 12v at the coil. If there is a mechanical fuel pump (72-74 models) you will need to route the hose to a plastic jug or disconnect the inlet from the fuel pump which will require a fuel hose clamp.
You are looking for 60 psi of so on a cold engine. When you start it the oil pressure may temporarily raise to 80-100 psi. If you don't have a gauge you can at least look at the oil light on the dash. It must go out with about 5 seconds after the engine has started otherwise damage may occur.
Once the engine looks safe to run, take the time to perform a few more tests after it warms up.
Vacuum Gauge - this test indicates how well the engine is breathing. The pumping action of the pistons produces the vacuum but only if there is a restriction between the combustion chamber and the air intake. When the engine is idling the gauge should read 15-17" of vacuum with 7.5 BTDC timing and 12" with 5 ATDC (retard) timing at the specified idle rpm. If the idle rpm if very high but the vacuum level is normal, then you have a leak that the PO tried to mask. Although these numbers seem low they are normal for a VW engine with it's low compression ratio. Low readings are usually indicative of a vacuum leak somewhere in the system and the problem can usually be traced to a bad hose or gasket. You must fix this problem because the leaks occur downstream from the FI/carb and result in the air/fuel mixture leaning out as I explained earlier.
Of particular note is the EGR system which takes exhausts are reroutes some of it back into the intake to reduce emission. If this system of pipes is not sealed you will have a terrible vacuum leak. If part of the system has been removed the EGR valve must be blocked off. On FI models the valve feeds a tube that leads to the throttle body on the early FI models, on the later ones the valve is bolted to the plenum. On 73-74 carb models, the EGR pipes feed the intake manifolds.
Another consideration are the brake booster hoses. The brake booster feeds off the engine vacuum. If you have a leak anywhere in that system the engine will stumble (low vacuum) and the brakes will be hard to apply.
As the engine rpm increases so does the vacuum level and you can watch the reading on the gauge increase. This gauge is more useful however in diagnosing wear. The vacuum gauge was the traditional mechanics tool before the engines and tools became computerized. At any rpm the needle should remain steady. When it's bouncing around it indicates whether or not the piston rings are worn, valves are burned or misadjusted, etc. When you snap the throttle closed the needle on the gauge should raise quickly the return to the idle position. This is because the closed throttle creates a high vacuum condition. If not, it means that air is coming in from somewhere else which is bad. When you first open the throttle a huge volume of air dumps into the cylinder and the gauge reading will drop: this is normal behavior also to contrast it to the movements that indicate breathing problems.

Compression test - if you can't perform a leak-down test, a compression test is the next best thing. In fact, what a compression test will tell you that leak down won't is what the CR ratio maybe. 2% leak-down and 150psi on a cylinder that should be 135psi is an indicator of a misconfigured engine or a misrepresented one.
Unless this is a 72 bus with no engine access hatch accessing the spark plugs will be easy. On the 73-74 models there is some tubing obscuring the plugs and you will have to remove the air cleaner to gain access. On FI models all plugs are accessible except for #2 which requires the air cleaner to be removed first.
The engine needs to be run for 5 minutes to warm up so you'll need to loosen the plugs beforehand because you don't want to remove them from a hot head when the threads are softer. See my Compression testing instructions for the procedure. A new engine with normal compression will read 135 psi per cylinder. As the engine ages the compression will drop to 71-85 psi and necessitate a top end rebuild. If the compression is too high it means the engine was assembled incorrectly or the compression has been raised on purpose. Compression is affected by altitude so be sure to convert the number for you city before you consult the Bentley specifications. Serious problems may by indicated by no compression at all. An incorrect valve adjustment will also lower the reading. Engine power will be directly related to the compression reading. If the variance between cylinders is too great the engine will shake.

Valve inspection - remove the valve covers and take a look at the valves. None of the valve springs should be extended too greatly which indicate damage. All of the nuts should be tight and the push rod tube retaining wire should be in place.
As the valve train wears, the clearances between the stem and the adjusting screw should only be getting larger. If not, then it means the valve is stretching or the seat is dropping allowing the valve spring to pull the valve closer to the adjusting screw. Excessive valve lash results in a noisy valve train that pounds the seat that the valve rests on so you must adjust your valves at regular intervals. The intake valve is constantly cooled by the charge of incoming air but the exhaust valve relies on the seat to wick it's heat away to the head. When the valve stretches it can no longer seat properly and this accelerates the stretching. This also results in a compression loss. If the valve is stretching then you must replace the head ASAP ro prevent damage to the pistons and engine internals. Worn valve adjusting screws make adjustment and inspection difficult so replace those with new screws right away.
Oil temperature - this is probably the least understood measurement. Oil temperature is partially a function of the ambient temperature and people try to minimize it for long engine life when it's head temperature that matters most. The oil temperature is also affect by the rpm of the engine and difficult to predict without some empirical data. No matter the influences, what matters most is that that oil temperature not exceed 250F because petroleum based oils begin to break down. The oil viscosity of multi-grade oils is measured at 32F and 212F and as such the higher rating is the intended operating temperature. All stock air-cooled engines tend to run higher engine temperatures than their water cooled counterparts. Keeping the oil temperature within range (180-220F) can be helped by selecting a thicker oil if the temps are too high as well as reducing speed on the highway especially in hot weather. Remember you are driving a big box down the road and the wind resistance makes the engine work hard to maintain current day highway speeds that are much higher than the speeds that existed when the bus was built.
You can ball park the temperature with an infrared thermometer aimed at the strainer plate on the bottom of the engine. Another option is to stick a thermometer down the dipstick tube but like oil temp senders installed in the taco plate (914 sump cover) the readings temp to be coldish because the hot circulating oil doesn't make it to the corner of the case where the dipstick probes.


Cylinder head temperature - if you do not measure the cylinder head temperature of the engine you have no idea if the engine is overheating or not. The cylinders are made from cast iron and do not cool as efficiently as the rest of the aluminum the engine is made from but they were used because they are inexpensive. Aluminum cylinders cannot rub against aluminum pistons without very expensive coatings applied. Porsche and Mahle pioneered this technology decades ago and the technology is the reason those Porsche P&C sets are so costly.
The engine is air-cooled by the fan that is directly connected to the crank. Cylinder #3 is traditionally the hottest one because it at farthest from the fan and on the side that shares the left air pathway with the oil cooler which consumes some of the air flow. The best investment you can make for long engine life is to install a cylinder head temperature gauge on the engine.
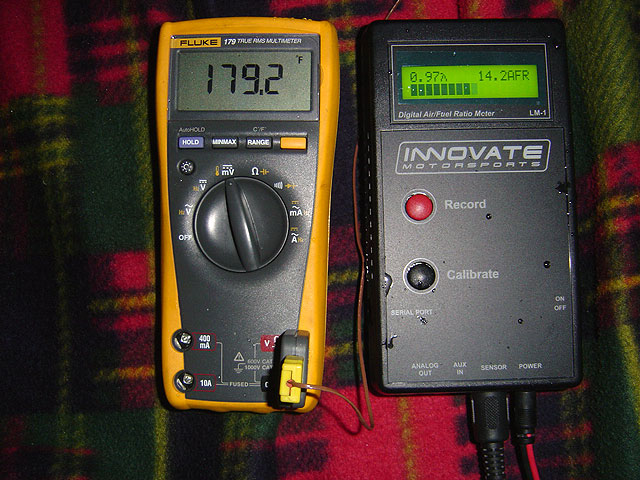
If you have a temperature measuring multimeter and thermocouple you can adapt it to a ring terminal that fits under the spark plug without having to wire up a CHT gauge for testing purposes. I bought a Fluke 179 earlier this year after my Radio Shack DMM broke after 19 years of faithful service. The Fluke has been so versatile it's proved itself a bargain. I bought the temperature measuring model in anticipation of taking more accurate measurements than the VDO setups. It comes with a thermocouple probe and it's the least expensive way I know ($175) to measure the CHT that uses cold junction temperature compensating circuitry for accurate digital readings. All you need are a few inexpensive connectors and K-type thermocouple wire from your local electronics supply for 50 cents/ft so you can read the display from the driver's seat. Actually, the ring terminals actually proved very hard to find because the spark plug is 14mm and the ring terminals don't open up that big without being too wide to fit in the spark plug well.
Average cylinder head temps should be around 375F running 65 MPH on the highway but when the outside temperature increases so does the head temperature. Having said that limit the head temp to 425F for short periods only. When the engine is run for long periods of time at higher temps the heads suffer. One indication that the head has been overheated is a tight valve. Unless you have hydraulic lifters, solid valves normally require 0.006" clearance (lash) between the stem and the adjusting screw when the engine is cold. This is because as the engine warms up the clearance disappears as the metals expand.
This part is the most subjective and depends on how many VWs you've driven. The gas pedal should feel firm and responsive if it's not the engine may be pooped out as indicated by your testing or the throttle cable may simply have too much slack in it. This will indeed be the case when you can't reach top speed.
Perform a quick check of the idle speed and timing before heading out on the road.
Don't head for the highway right away so you can test the brakes and clutch and let the engine warm up. If the clutch cable is original and snaps you want to be as close to the driveway as possible.
The engine should idle smoothly, accelerate smoothly and go into all gears easily. Surges of power indicate tune-up issues as do lack of power when the other tests have checked out. Backfiring is obviously bad but loud engine noises can usually be attributed to the exhaust (leaks and rust holes). Engine knocking noises should initiate a shutdown because they aren't normal.
You've bought the bus because the engine checked out, now you need to perform an immediate maintenance on it.
Oil change - changing the oil should be done asap. Replace the oil, the filter and clean the oil strainer. Use new gaskets and washers on the strainer and be sure to observe the strict torque values on the plugs (the strainer plug is especially sensitive: 9 ft. lbs max and no more which is below the range of the average torque wrench).
When you add oil remember to fill the oil filter with some oil first and lube the o-ring. When adding oil to the crankcase leave it 1/2 quart shy of the spec. Since you can't remove all of the oil you may overfill the engine and it's better to under-fill and be within the marks on the dipstick than to overfill. Run the engine and let is sit overnight, check the oil level again in the morning on a flat surface and add whatever is needed to being the level to the top.
Overfilling is a common mistake largely due to adding the spec amount of oil but not dropping the strainer first. The strainer area of the case will release another 1/2 quart of oil.
Valves - adjustment has to be made every 15k miles at the minimum and the who knows when the last one was done? Hydraulic lifters are advertised as not requiring periodic adjustment but they do require period inspection which amounts to resetting them. Much in the same way that folks who install electronic ignitions in their distributors forget to lubricate the wick, owners with hydraulic lifters forget to check their valves thinking they do not require adjustment (they only hold their adjustment better). As for solid lifter valve trains, if any valve seems tight avoid an immediate adjustment on those valves and adjust the rest to spec. Perform a leak-down test immediately.

Distributor - adjust the valves before taking on the distributor. All VW ignition systems except for the 79 CA bus has contact breaker (points) style ignition. Every 15k miles the points require adjustment but they do not last that long in practice. As they wear the gap becomes larger and the surface pits which negatively affects the spark produced. Setting the points gap requires a feeler gauge and it's difficult to get the gap just right. I use a dwell meter to test the adjustment and tweak the adjustment until I get it right. When the dwell reading is as close as 50 degrees as possible you will make the most engine power. I recommend putting in a Pertronix 1847V electronic ignition from CIP1.com for $59. It's easy to install and you won't have to adjust the dwell ever again.
Aside from the points, the rest of the components wear and affect the spark. The distributor cap cracks and grows carbon tracks. The end of the rotor wears away from all of the sparks that occur at it's tip. The condenser can fail and burn out the points prematurely. The resistance of the spark plug wires increases to a point that the current produced at the spark plugs is reduced and the insulation eventually breaks down. The spark plugs wear if they haven't suffered from fouling or overheating already. All of these components are inexpensive to buy so it's easy to get running properly (buy genuine Bosch parts only) . Check all of the metal terminals for corrosion and replace as necessary. This includes the terminals on the ignition coil.
The distributor itself is pretty sturdy but it can wear out from neglect. The points have a rubbing block that wears against the cam on the shaft inside the distributor. The cam is supposed to be lubed with distributor grease but often is not. When it wears it affects the the dwell which affects the spark. The shaft itself is supposed to have a slight up and down movement but no side to side movement which indicates that the bushing inside have worn. There is a felt wick in the center of the shaft at the top for you to add a drop of oil with your tune-up. It's unlikely the PO or his mechanic remembered to perform this step.
Oil leakage at the base of the distributor where it meets the case indicates a worn out distributor o-ring.

Timing - this should be the last step in your tune-up procedure before adjusting the carbs and/or the fuel mixture. Timing is a relatively simply procedure: you need to aim a timing light at the timing scale and pulley and twist the distributor one way or another until the idle setting is in spec. Then you adjust the idle rpm and you are done. Bentley contains all of the specs and you need to follow the instructions for setting the timing with or without the various vacuum hoses connected to the vacuum can. You may come across a non-stock distributor such as the Bosch 009 (no vacuum can) and because of it's limited ability you may have to set the idle rpm to 10 degrees and ignore the spec. My advice would be to replace this distributor with a stock vacuum unit. It's reported to give better mileage and drivability. See the Bosch 034 vacuum distributor that CIP1.com sells.

Idle mixture - unless you've developed an ear for the way your engine runs you will need to have the mixture adjusted by someone who owns an exhaust gas analyzer. If you live in a smog testing area like most of California you should have a shop perform this for you so you have a good chance of passing your smog test. The #1 emission failure is mixture too rich (%CO value too high).

11/21/04 - Created
09/07/11 - Fixed broken photos, added translate button, updated footer
07/15/19 - Google update: new adsense code, removed defunt translate button